


Table of Contents [Show]
Welcome to our guide to the Marvel Rivals Map - Intergalactic Empire of Wakanda: Birnin T'Challa! Here, we will explain the layout of the Map, and learn about each section so you can take advantage to defeat your enemies.
From a single Vibranium meteorite, Wakanda rose to greatness. Now, at the heart of the galaxy, they’ve uncovered the homeland of that very mound.
But no matter how far it's technology advances, Wakanda's strength will always be its people. Wakanda Forever!
Map Type: Domination
Birnin T'Challa is a Wakanda-themed mode with 3 separate maps:
- Imperial Institute of Science
- Warrior Falls
- Stellar Spaceport
Both Casual and Competitive modes will pit both teams against each other to capture the center of each location. Locations are randomized in order on a match to match basis, and completing a match will load the next location that hadn't been played yet.
This guide will break down each location in detail, highlighting different routes, features, and secrets. Each map is symmetrical, so both sides will have the same paths but mirrored. You can use any of these highlighted paths as an offensive push, or ways to flank the opposing team.
Imperial Institute of Science
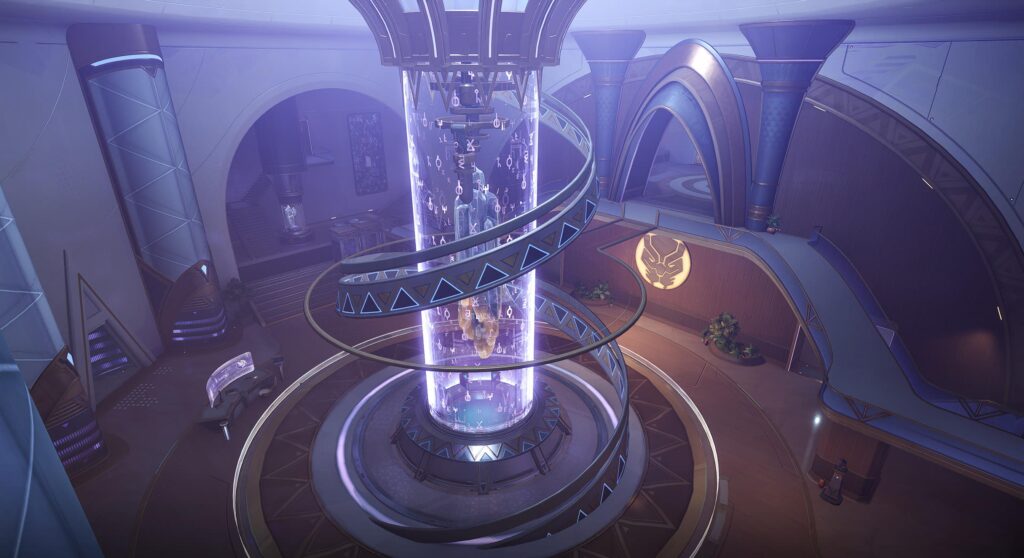
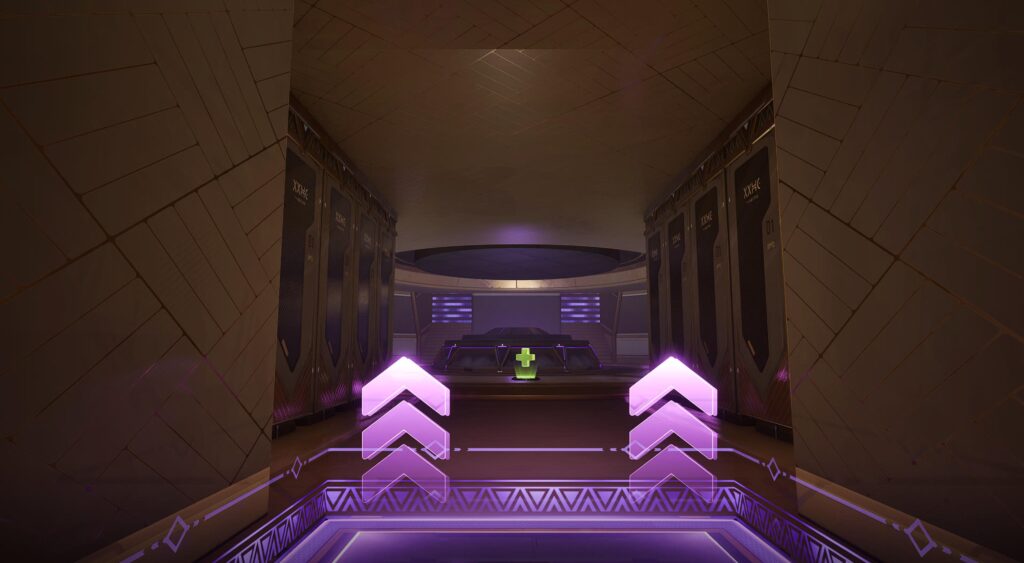
This map features a large room in the center of a rectangular map. The illuminated pillar in the center can be destroyed, which opens a path underneath the objective and erects large walls on opposing sides of the objective.
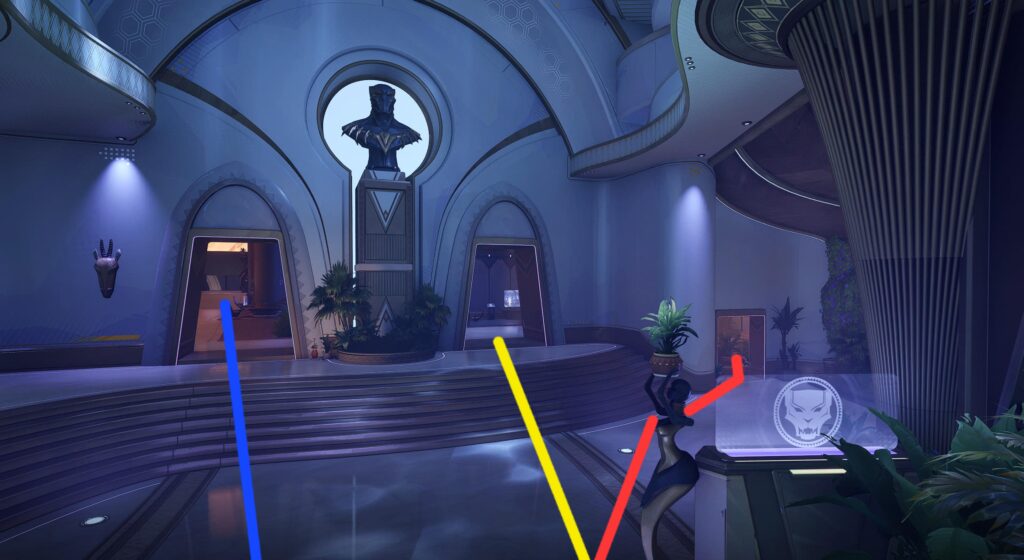
Leaving from the spawn room, you have 3 doors to choose from:
- Blue- This is the typical path most players will take to quickly head to the objective.
- Yellow: This leads to the same room as the blue path, but gives a more direct route to the bounce pad.
- Red- This takes you to a completely different set of "red rooms" that cut behind the objective.
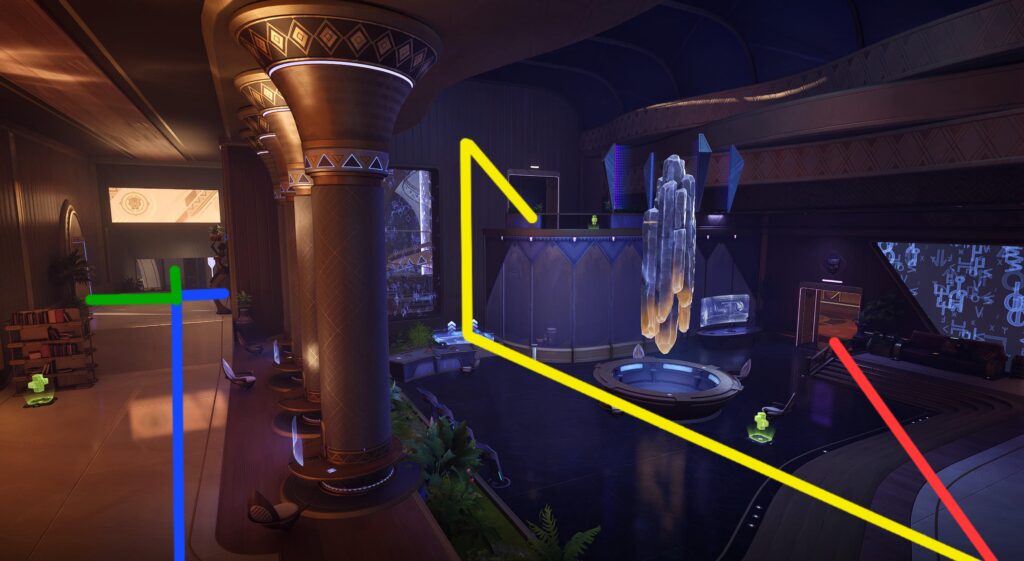
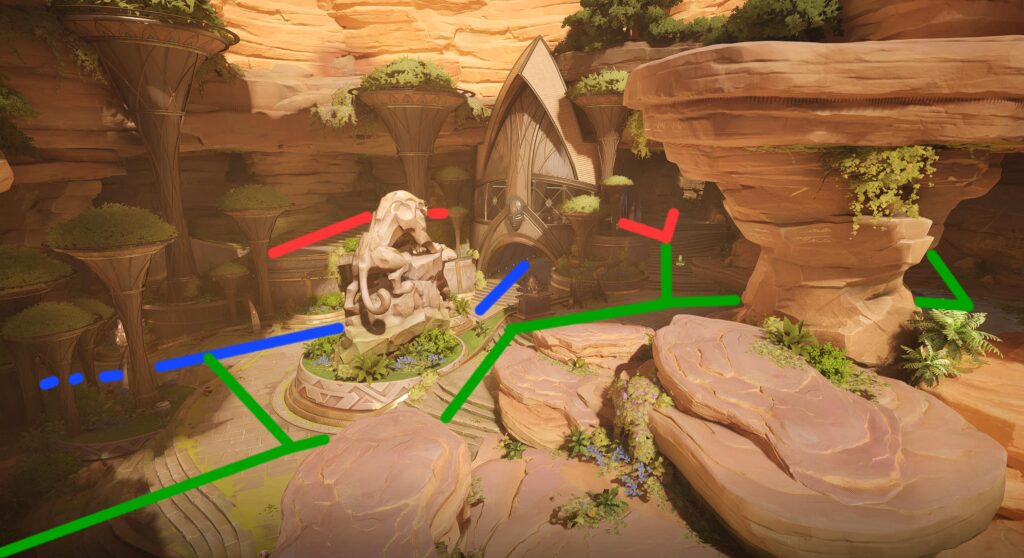
This image follows the yellow and blue paths to the adjacent room. From here, you can follow the additional paths or continue your original path:
- Red- This takes you to a secondary door that entered the red rooms.
- Green- This path branches off the blue route, and leads you to the open exterior front of the map.
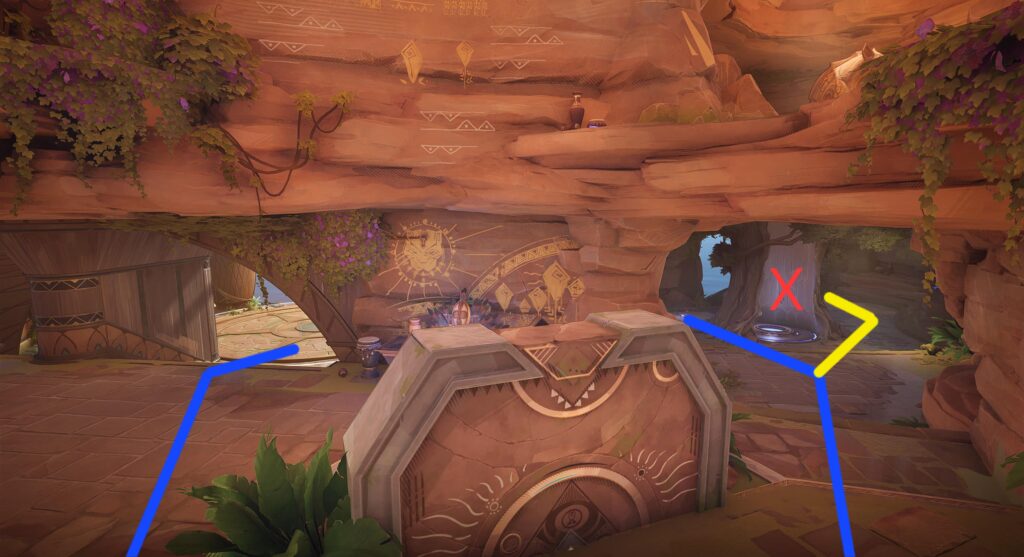
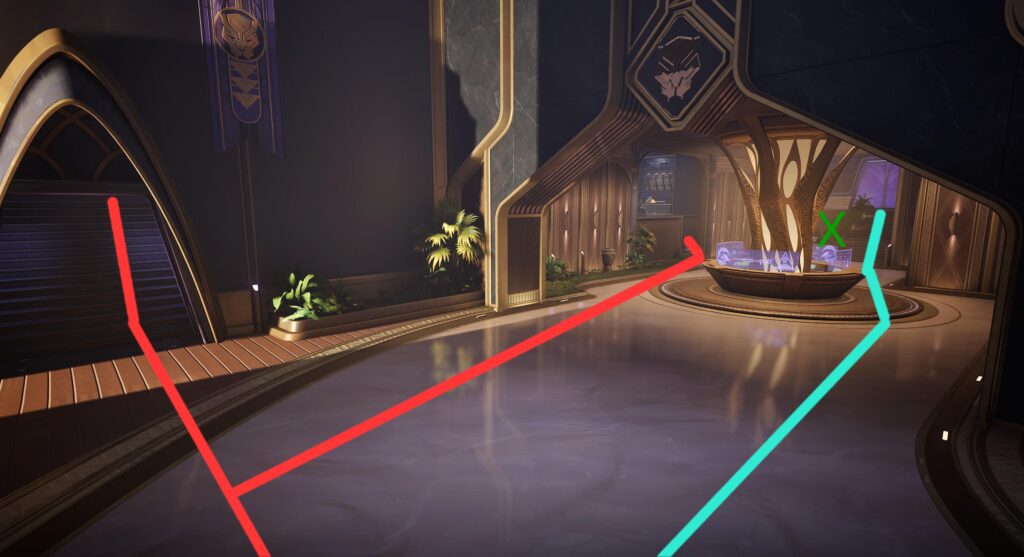
The red room paths converge here. You can take the door on the left to enter the main objective room. Alternatively, take the teal path, which leads you to an elevated area adjacent to the objective.
Once in this room off the teal path, you can destroy the glass in the center (marked with the X) to open the room to the objective. This can be helpful to attack opponents on the objective from a higher, side angle instead of head on. The room also houses a health kit, which can help you in a pinch.
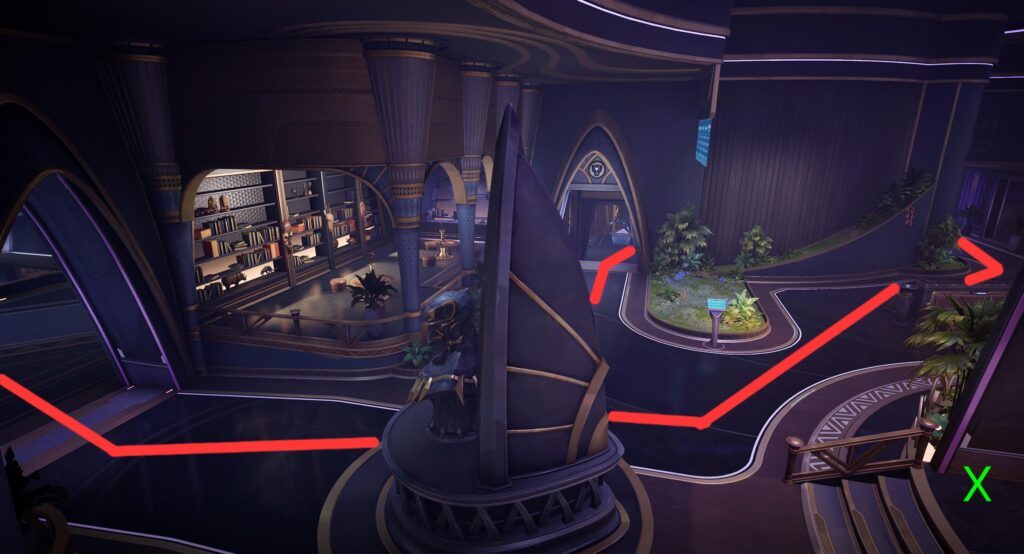
On the opposite side of the objective, this image highlights the exterior front side of the map. The green path can take you up to a balcony that sits above the objective. Alternatively, you can take the downward route through the grass to the lower portion. The X highlights a health kit hiding behind the large planter. You can also use the black path to jump doen to the lower level, rather than walking the lower green path.
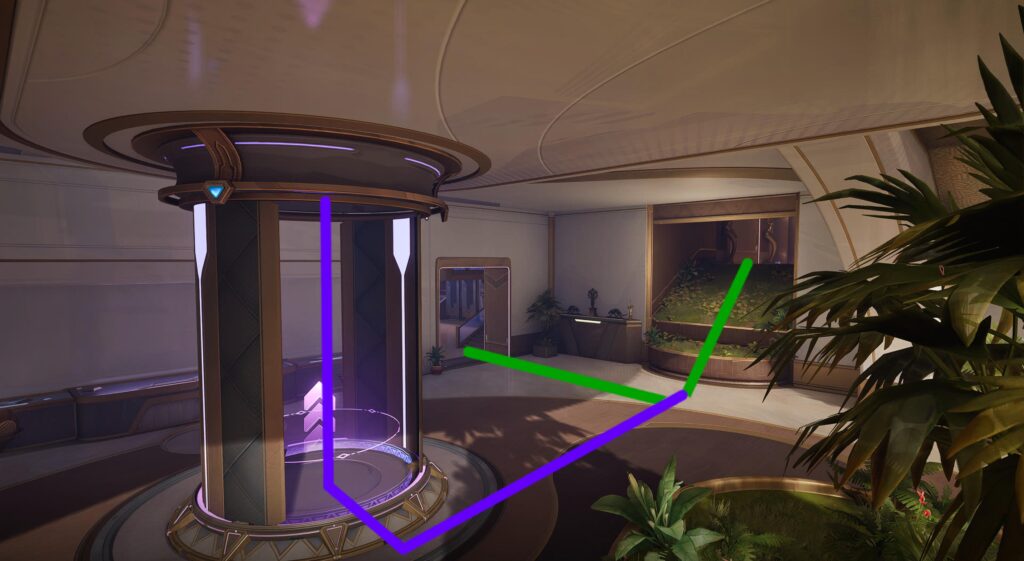
This is a closer look at the lower exterior front of the map. The green path moves down the grassy slopes and cuts into the objective room. The purple path takes you up a jump pad to launch into the upper balcony above the objective.
From here, you can overlook the objective and assault the opponents from a hard to counter area. The platform just outside the doorway is destructible, so use caution when standing on it for lengths of time. The room also houses a health kit just behind the opening in the floor.
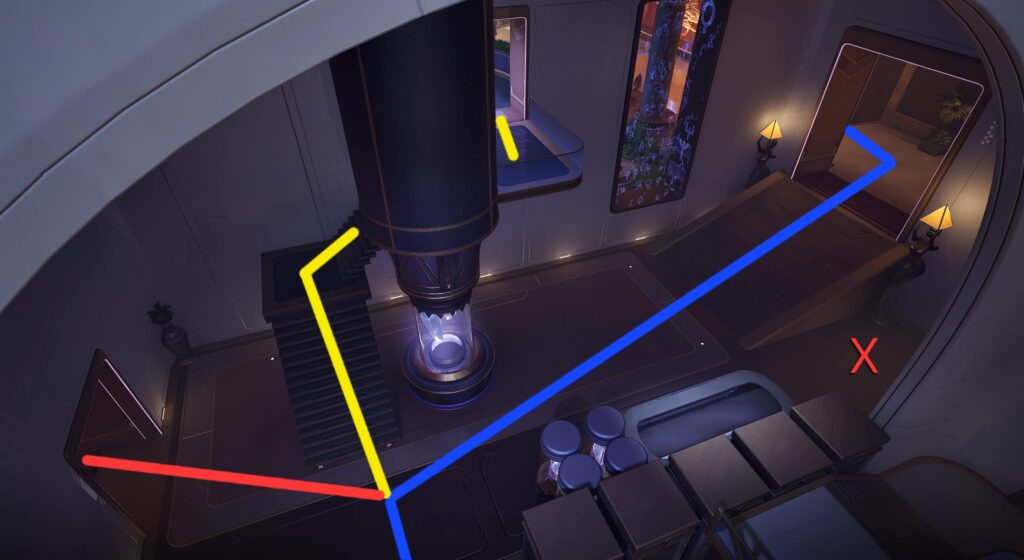
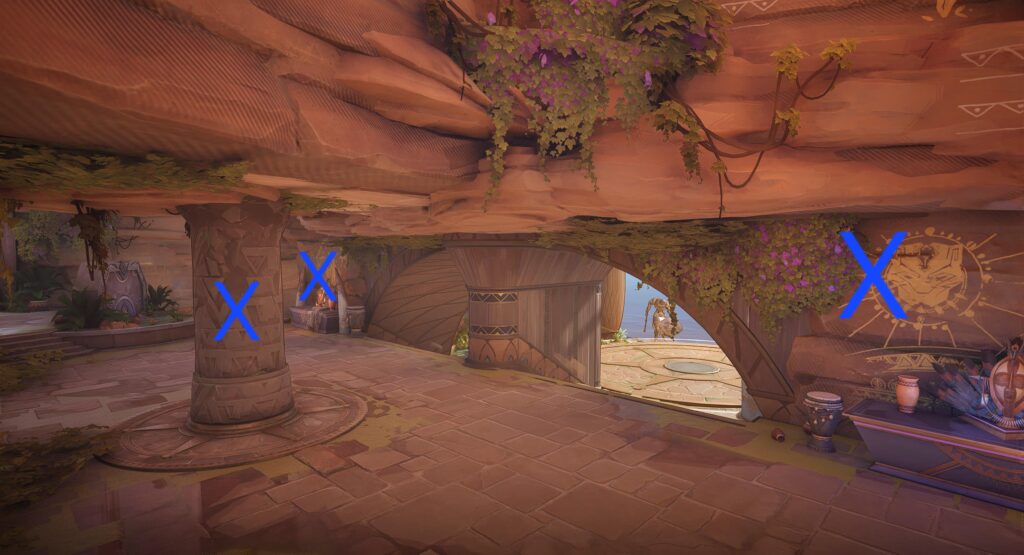
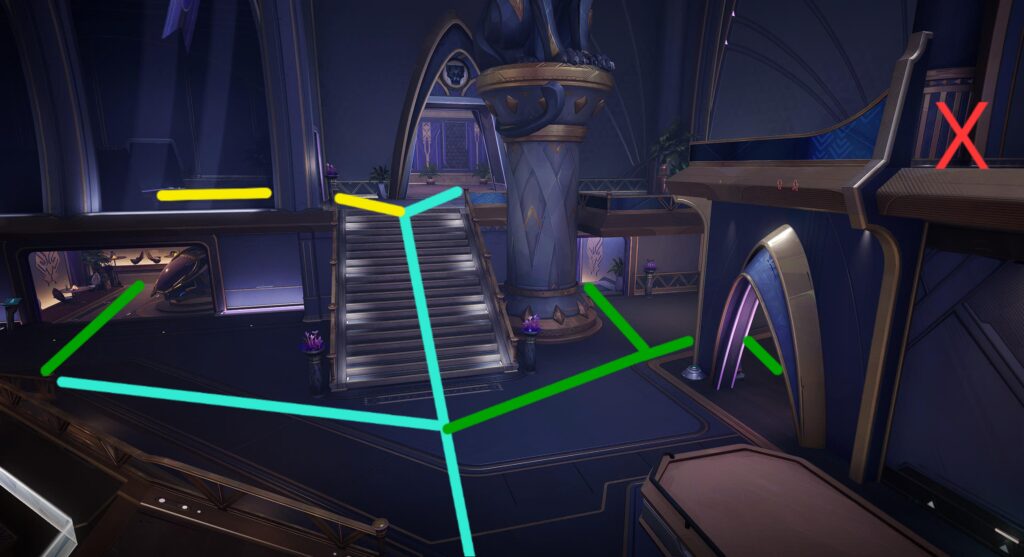
Back in the objective room, this shows the convergence of the beginning 3 paths. The X mark highlights a small corner tucked behind tall wall coverage. This makes for a great place to put a Rocket respawn station. The stairs the yellow path utilizes are also destructable, so the path can end abruptly at the elevated doorway if destroyed.
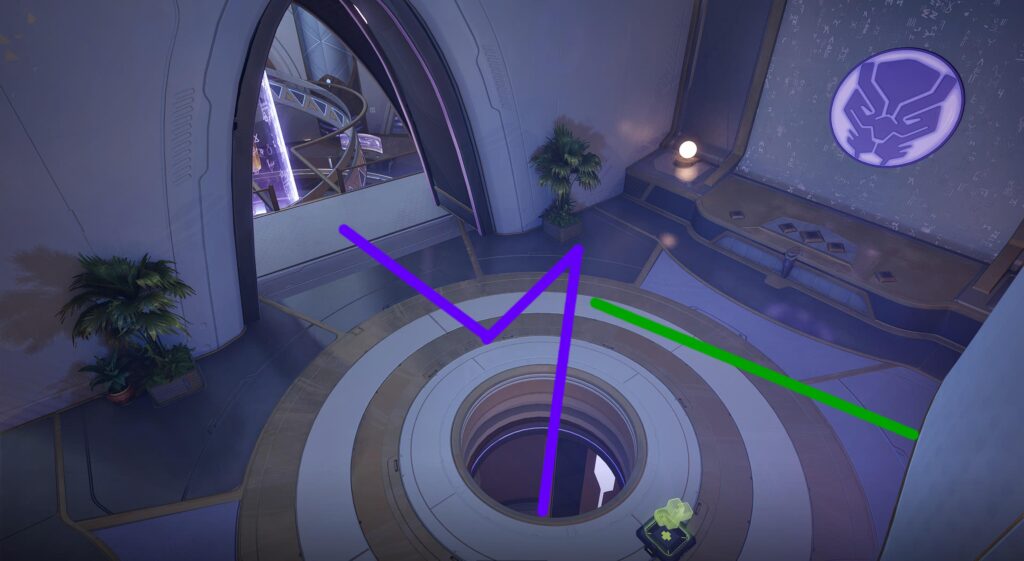
The X highlights the room on the teal path with the destructable window. The pink X's show mirroring paths that cut under the objective. Once the center pillar is destroyed, you can access the same path via the opening.
Under the objective, the 2 pink X doors lead to the stairs at the end of the image. A jump pad sits at the opposite side, which leads you to the lower exterior area. A health kit sits in the center of the corridor, which can be helpful in a desperate situation once the center is destroyed.
Area Secret: In the spawn area of this map, you can complete an achievement. Head over to the blue computer screen and interact with the wall. Audio will play of Shuri which will trigger the achievement. Unfortunately, only one team has access to this room in a game, so you can potentially be locked out of access to the audio board in a match.
Warrior Falls
This map positions players in a V shape pointed towards the objective. There are multiple destructable portions of this map which greatly alter the terrain (more details below).
From the spawn point, you have 3 potential routes to take:
- Blue- This path leads directly from the spawn to the objective. Most players follow this path.
- Red- This path is often unused, as it leads through the upper room that gives no advantage. Once the map transforms though, the path features a quick shortcut to the objective.
- Green- This outer path takes you to the upper levels of the objective.
Following the blue path brings you to the central area in front of the objective. You can branch off the path to the yellow route, which cuts around the front of the objective in a very underutilized area. The X marks a jump pad that takes you to the upper level with the red and green path.
In the same area, you can alter the maps layout. By destroying each of the 3 structures labeled with an X, the ceiling will cave in and alter the avalible routes.
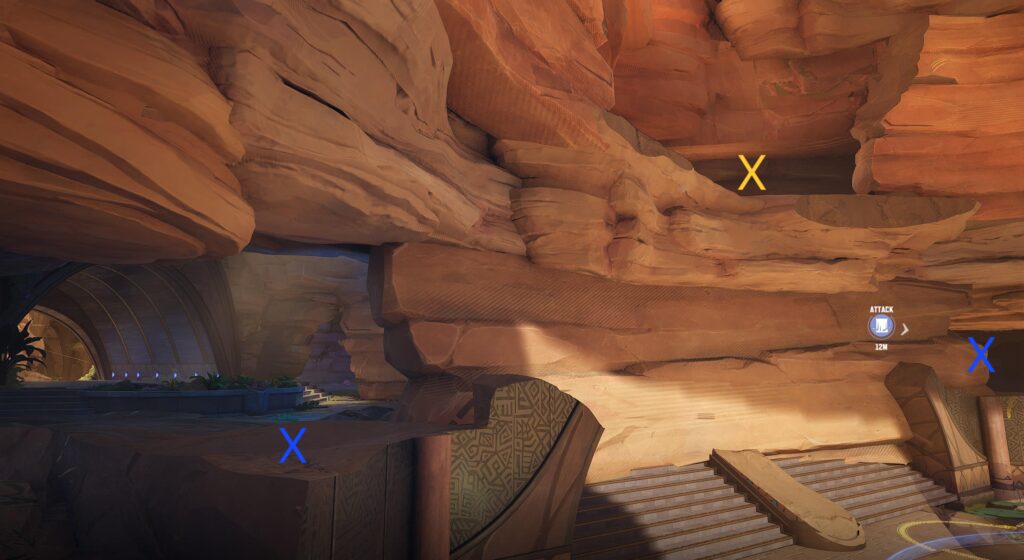
Once destroyed, the walls at the X mark become an open area to fire through, but the center stairs get blocked off. You do gain access to a new, upper path where the X is.

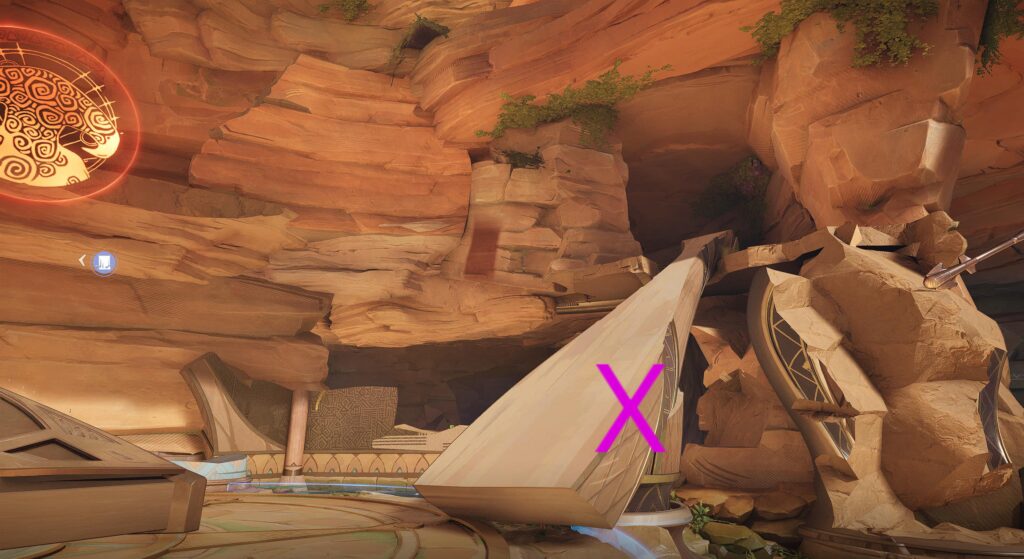
Remember that hidden path off the red route I mentioned? Once the map transforms, this opening in the floor will appear where the yellow line branches off to. Jumping down here will take you directly to a new, upper route.
On the objective, there are 2 pillars. By destroying the base (at the X), the pillar will topple, revealing a ramp to give you access into the upper red path without the jump pad.
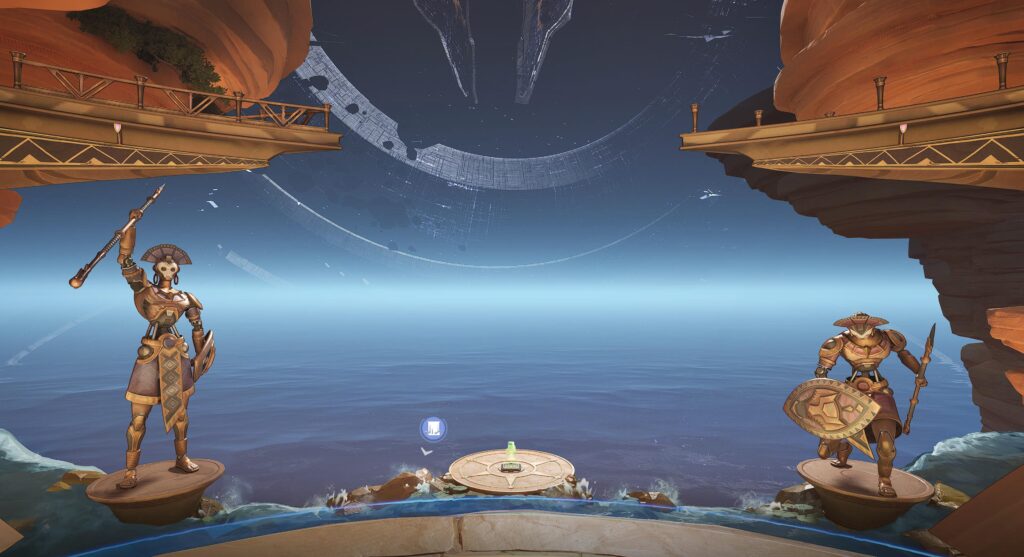
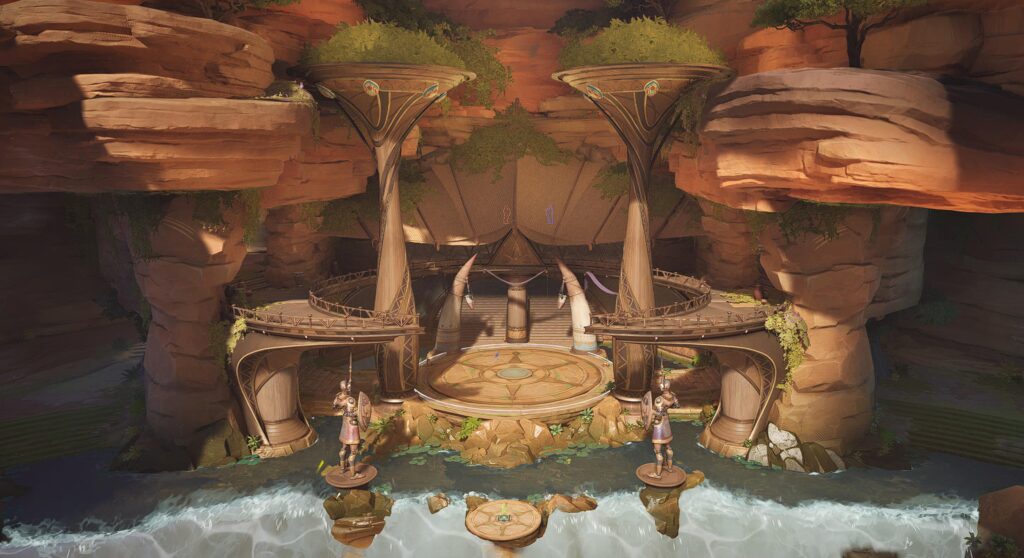
Area Secret: These two statues will actually move throughout the match based on which team owns the capture point. The team who currently owns the point will have the statue on their spawn side move into a victory pose. The team losing the point will have their statue move into a defeated pose. Once the objective swaps team ownership, the statues will swap poses!
Stellar Spaceport

This map pits players in another V shape to the objective. The map doesn't have a major destructable portion like other maps, and is an overall simpler map.
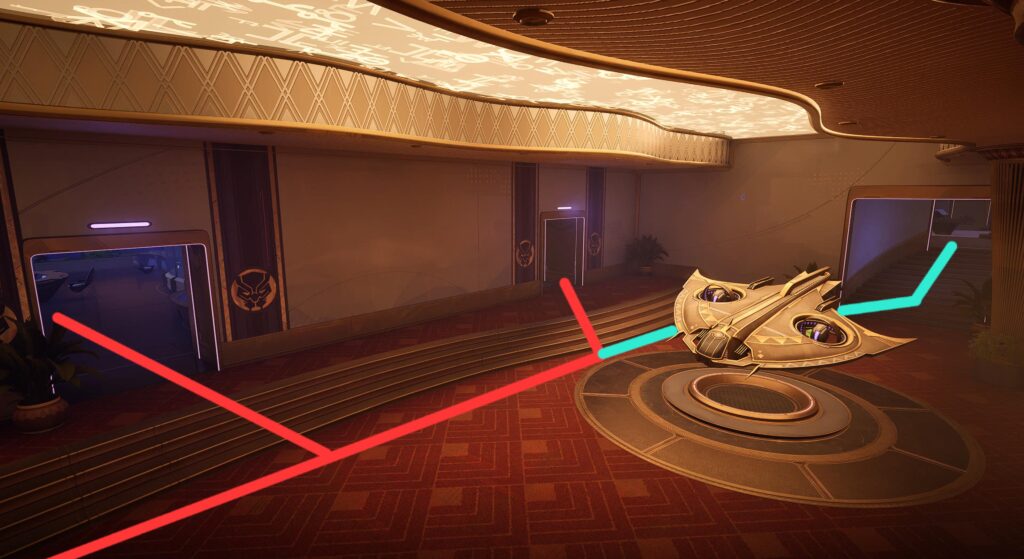
These 2 paths branch directly from the main spawn door. The teal path takes you directly to the objective, while the red path takes you to an adjacent upper area to the objective. The X marks a secret that we will cover later.
The red path leads to this large room that leads to the map center, right behind the objective. The X marks a health kit in the small room.
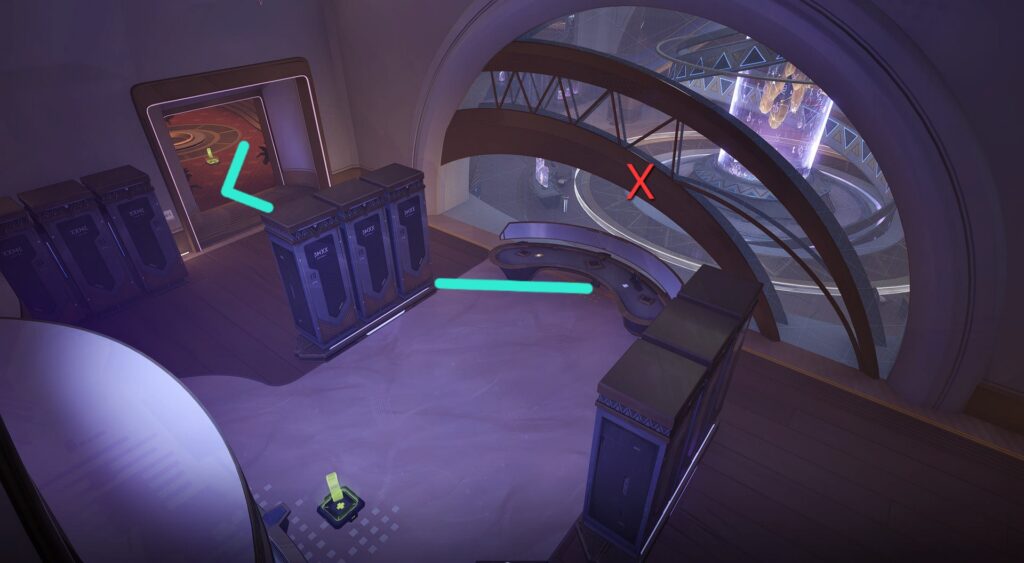
This is the area just behind the objective. The teal path shows the typical route players will take from the spawn. The green paths move to several rooms underneath the teal path. The yellow path cuts back into a elevated room adjacent to the objective. The X marks the exit for the red path.
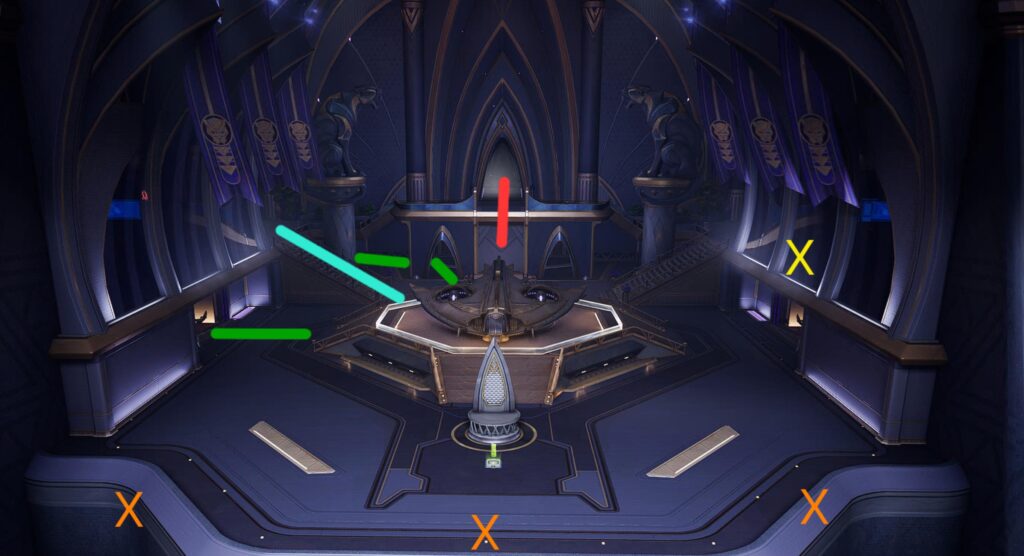
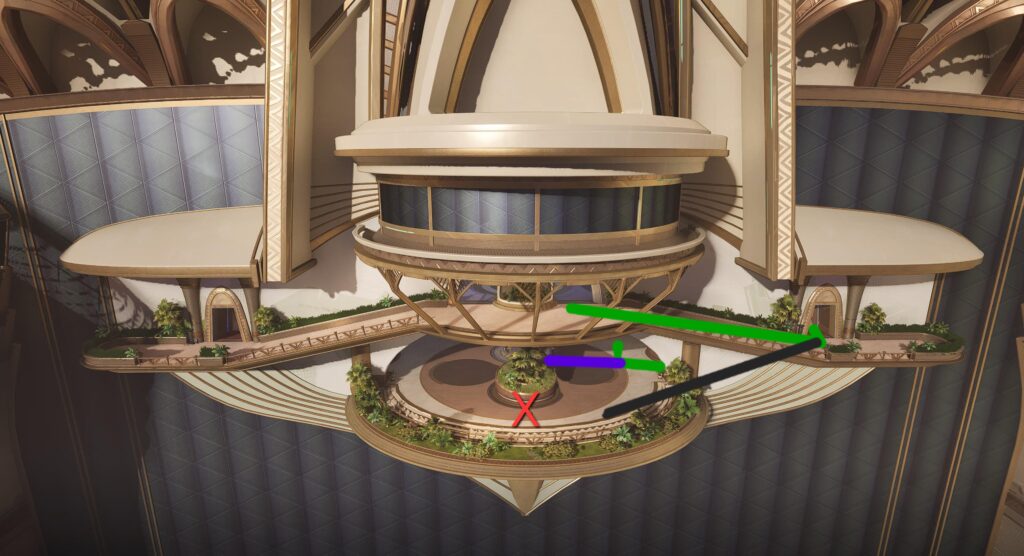
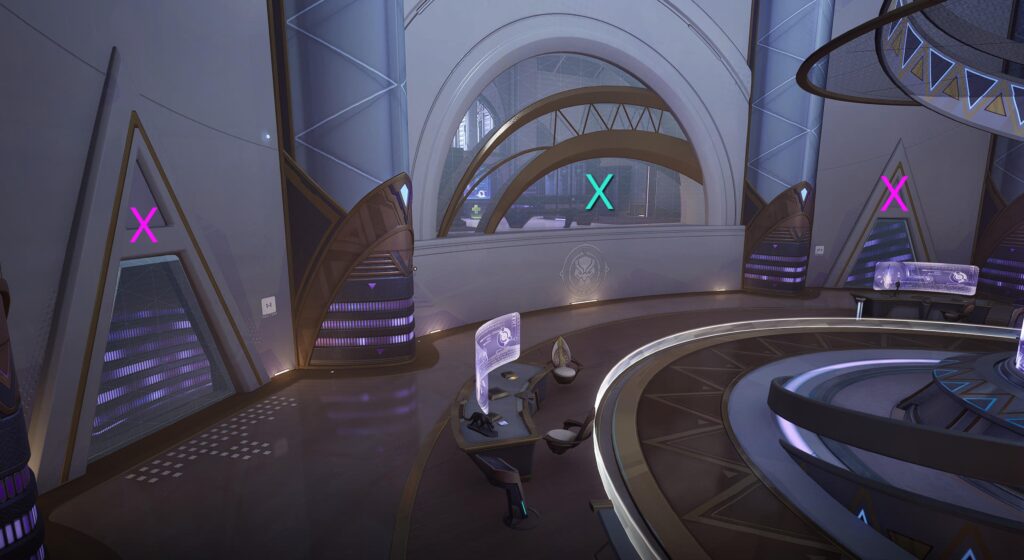
This arial view of the objective highlights a few important points. The routes are highlighted for context. The 3 X show the edge of the map. This general area is great for taking opponents over the ledge with Jeff's Ultimate or Invisible Woman's force push. Many opponents will seek out the health kit just above the center X, making it a great spot for Invisible Woman to patrol.
On the X, there are a set of indestructible objects along the glass. You can position yourself on the exterior via a ledge with your back to the objects. It makes a great position for Loki to place clones, or a simple vantage point over opponents passing underneath.

Area Secret: At the beginning of the spawn area following the teal path, you will come across a staircase. By shooting the stairs marked with the X, it will reveal a hidden path that opens access to the lower green path.
At the top of the stairs, the doorway with the X leads to a back hallway that connects to the yellow path room. Using this path can give you another route to attack the objective.
Achievements
- Shero of Wakanda
- Mind Palace
- Spreading Darkness
- Knowledge of Sin
- Mystical Power
- Scientific Strength
- Divine House Divided
- Wakanda Forever