Table of Contents
Welcome to our guide to the Marvel Rivals Map - Empire Of Eternal Night: Midtown! Here, we will explain the layout of the Map, and learn about each section so you can take advantage to defeat your enemies.
Midtown has fallen into eternal night, overrun by Dracula and his bloodthirsty legions. Iconic landmarks like the Baxter Building and Grand Central Terminal have become battlegrounds in the fight for survival.
Heroes must navigate the twisted streets and uncover the secrets lurking in the heart of the darkness.
Map Type: Convoy
The map is divided into 3 separate checkpoints. Each checkpoint rewards your team one point for pushing the convoy to it before time expires. While the convoy may be on this set path, there are numerous routes you can take to mix up attack strategies. This guide will highlight these routes in each section for you. It is written with the perspective of the attacking team, but defenders can utilize these routes as well.
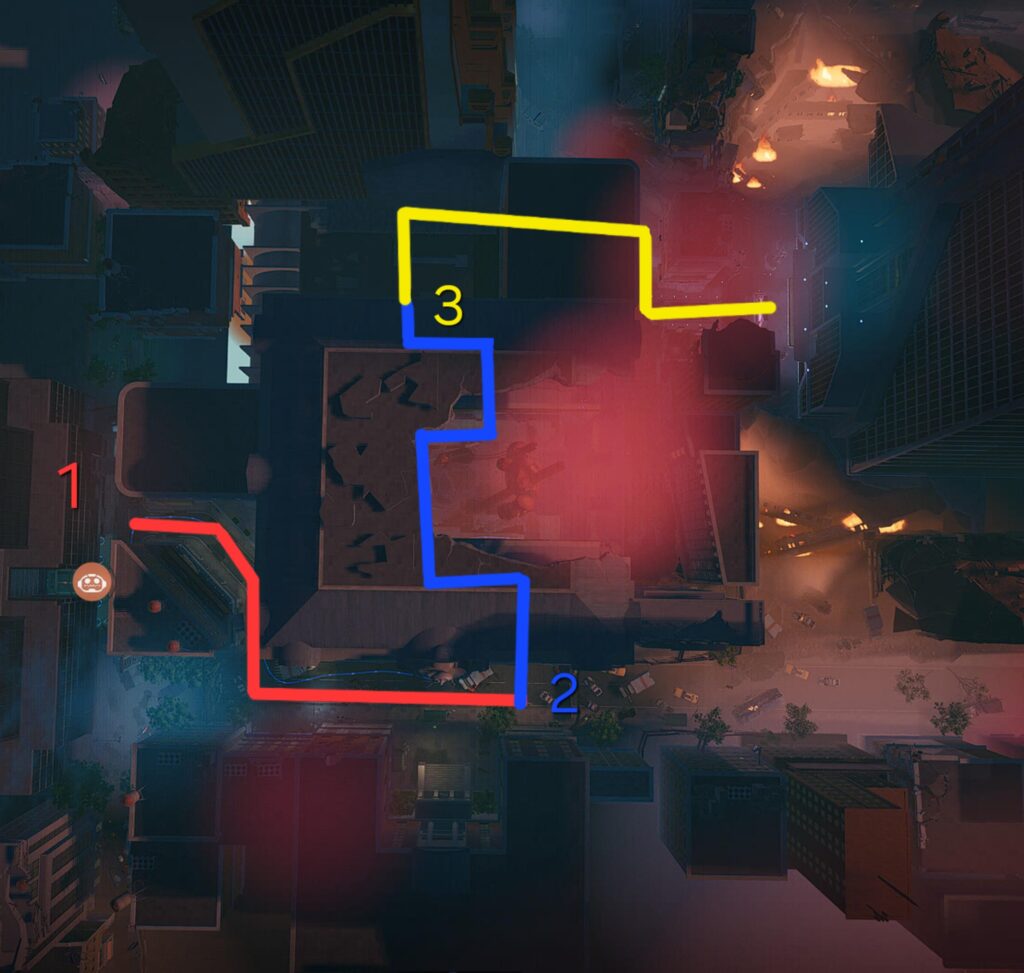
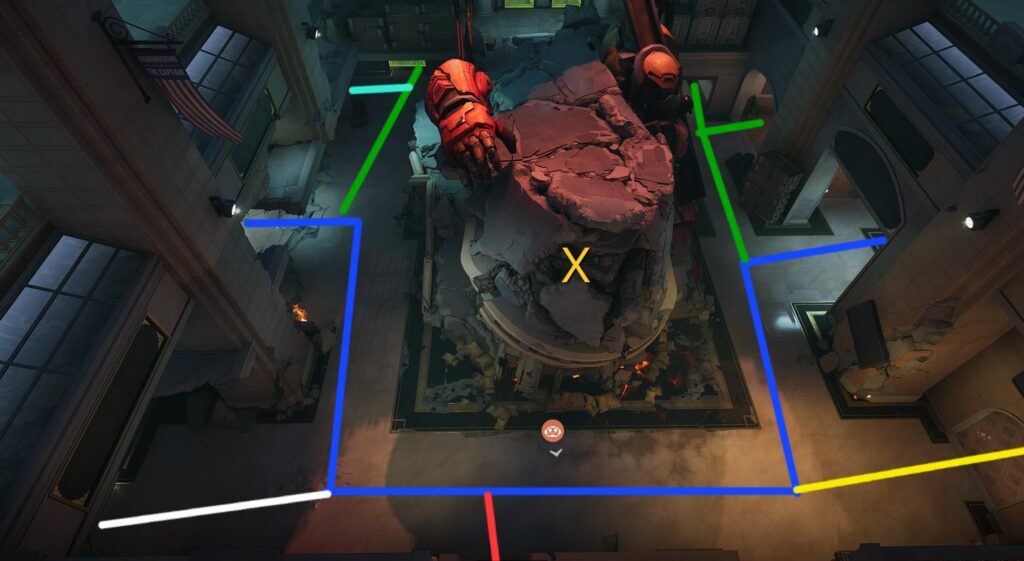
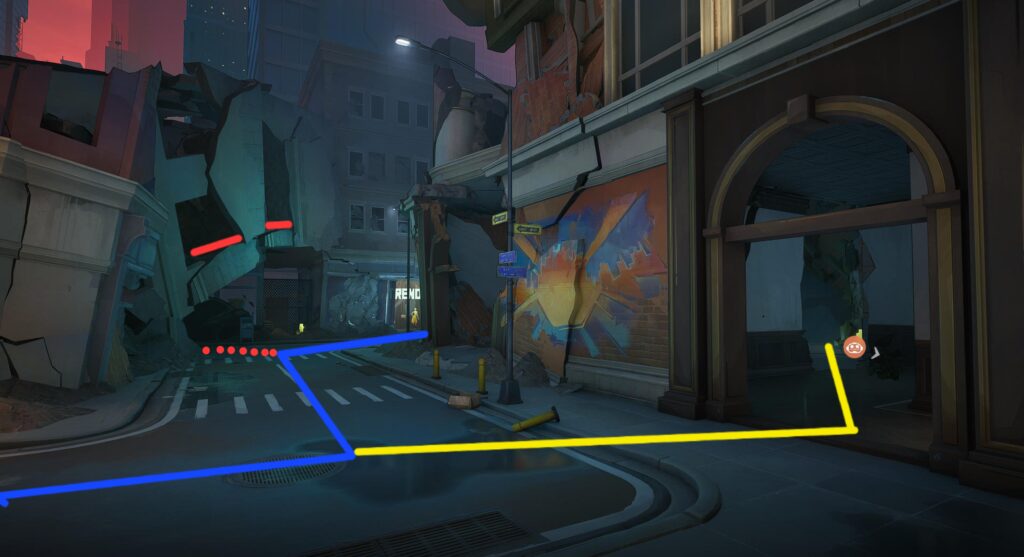
Section 1: Leaving the Baxter Building
The convoy starts at the base of the Baxter Building. It then follows the blue path around the city streets. There are multiple routes you can utilize to help your team escort the payload:
- Red: This represents the upper floor of the surrounding buildings. Attackers have direct access through the leftmost door of their spawn, which let's you cross a sky bridge to the neighboring building. You can use this area to get the high ground over opponents, or push defenders off their high ground hold. The dotted red like shows you can also access this upper area by climbing through the windows or using the ramp laying on the building.
- Yellow: This is a fairly common area for players to utilize when pushing. Most of the path has open windows you can shoot through towards the convoy. The benifit here is being less vulnerable out in the open compared to the standard route.
- Green: This area uses the bottom floor of the center building. It can get you pressure opponents from the other side of the road, as well as flank them from behind. Once you push the convoy far enough, you will often use this path as the fastest way to reach the objective after respawning.
- Teal: This small path is a very underutilized option. It cuts into a building to let you flank behind the objective, rather than push directly on opponents. It houses a health kit inside, and another health kit sits at end of the path behind the bus stop.
For general strategy here, you want one or two divers using the red or green path to pursue healers. This should give your team enough opportunity to force their tanks to retreat (or else lose their backline). After reaching halfway though this area, divers can move to the teal path to once again flank the back line without being seen.
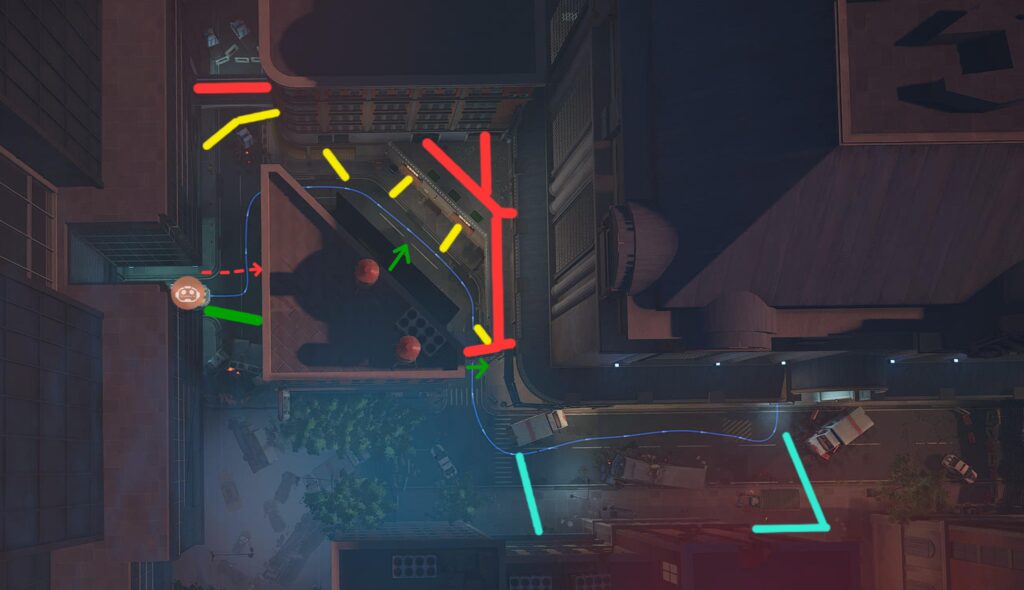
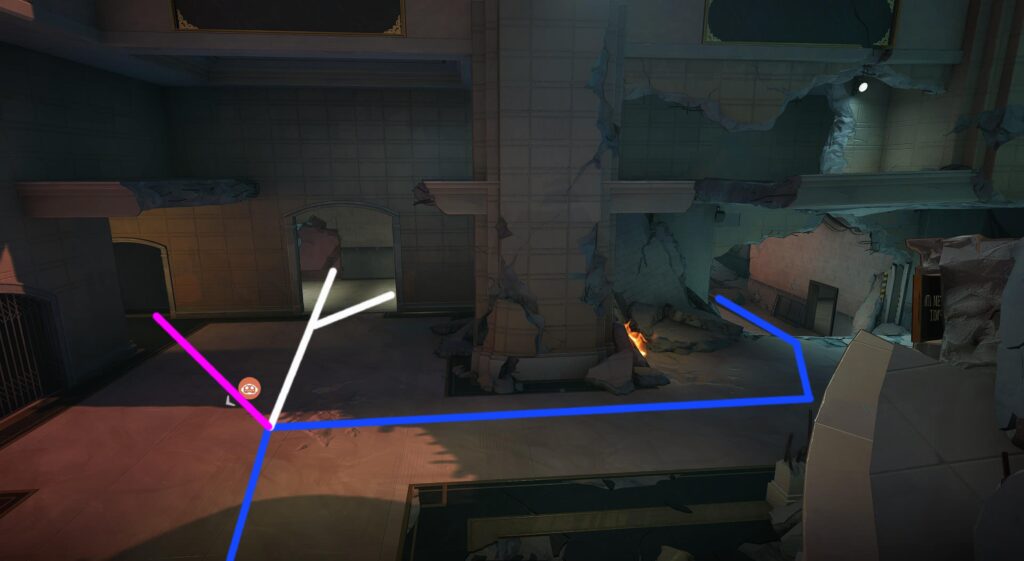
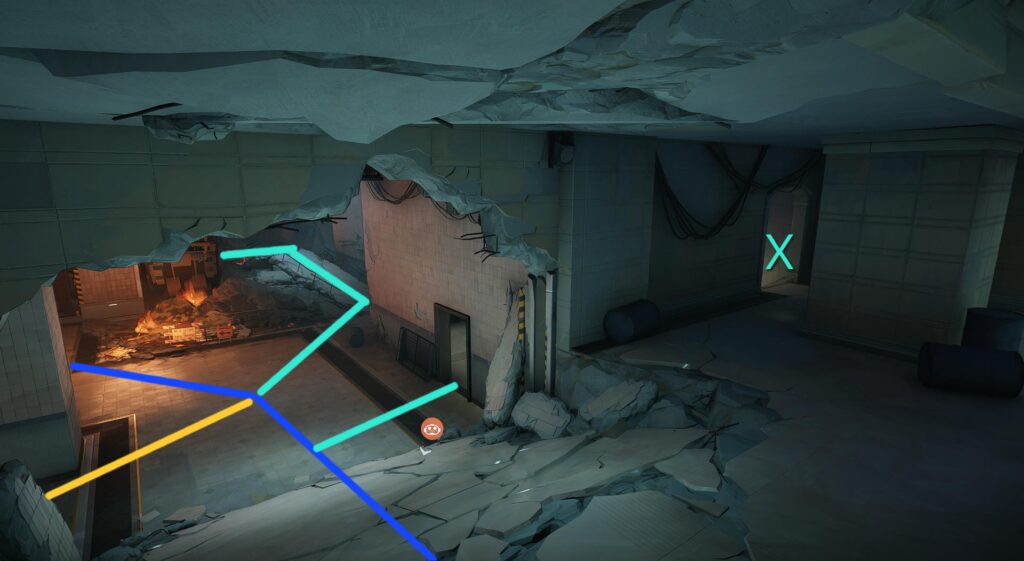
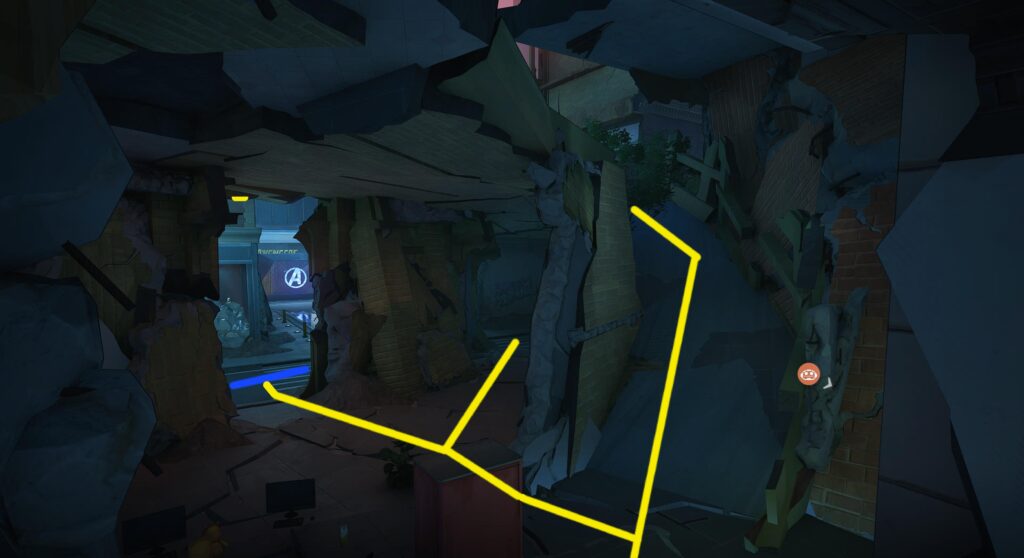
Section 2: The Subway Station
This view is the first thing a respawning attacker will see after hitting the first checkpoint. It gives you an idea of the routes you can start with to get inside the building, with the blue line continuing to represent the convoy path:
- Red: This cuts down a secluded halloway that cuts halfway into the center point of the building.
- Yellow: This the most common route players will take to get to the Convoy after it makes its way into the building center.
- Green: This lesser-used path let's you flank to the opposite side of the convoy, as well as give you opportunities for additional routes in the next room.
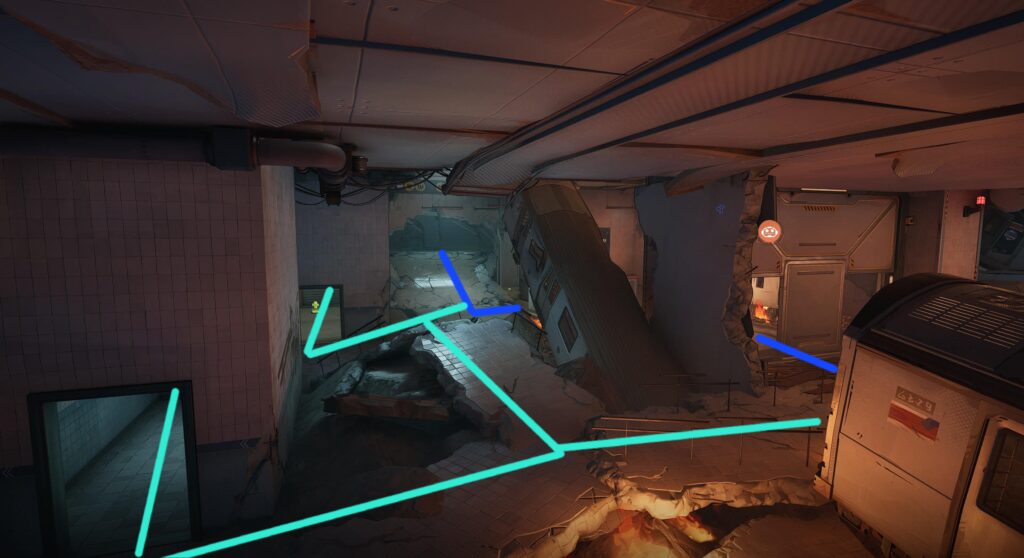
Containing from the previous image, this shows the center of the building. You can see where the blue convoy path meets up with the red and yellow paths shown before. The green path continues its flanking route behind the structure. The X in the center highlights the structure that can be interacted with, revealing an interior area you can walk through. If you can scale walls or fly, you can also stand on top of the structure for an arial view of opponents.
There are two additional branching paths here: White and Teal. Their purpose will be highlighted next.
The left, white path shows a flanking route that puts you on a platform over a common defensive holding area. The pink path shows an additional flanking option that is used much less often.
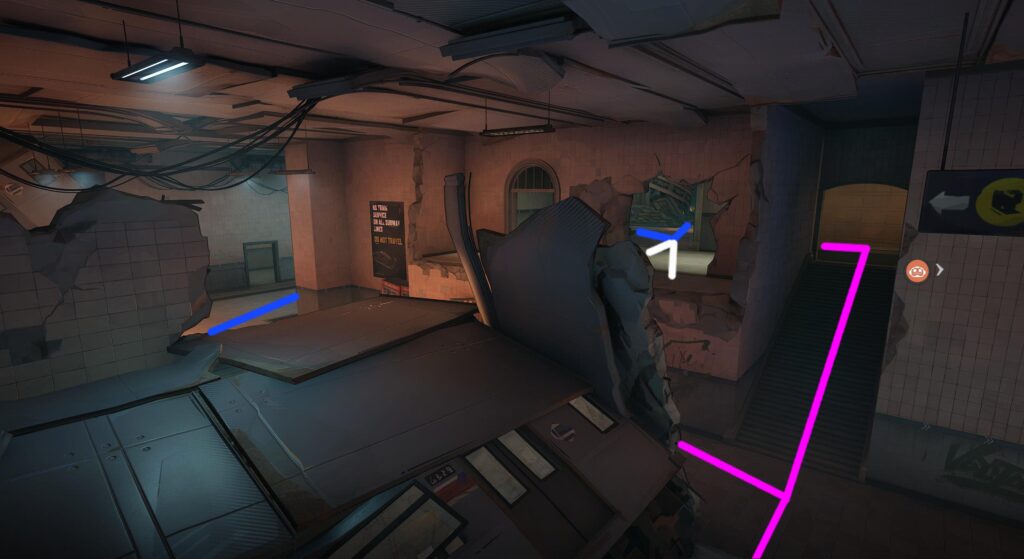
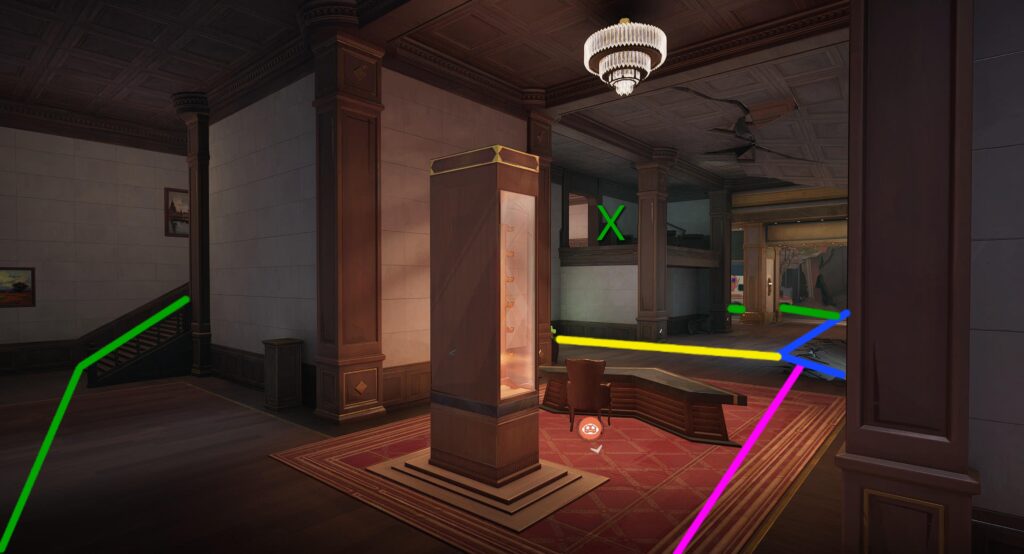
The next 2 images will show the same area, just positioned on the opposite sides of the train wreckage so you can clearly see the path options.
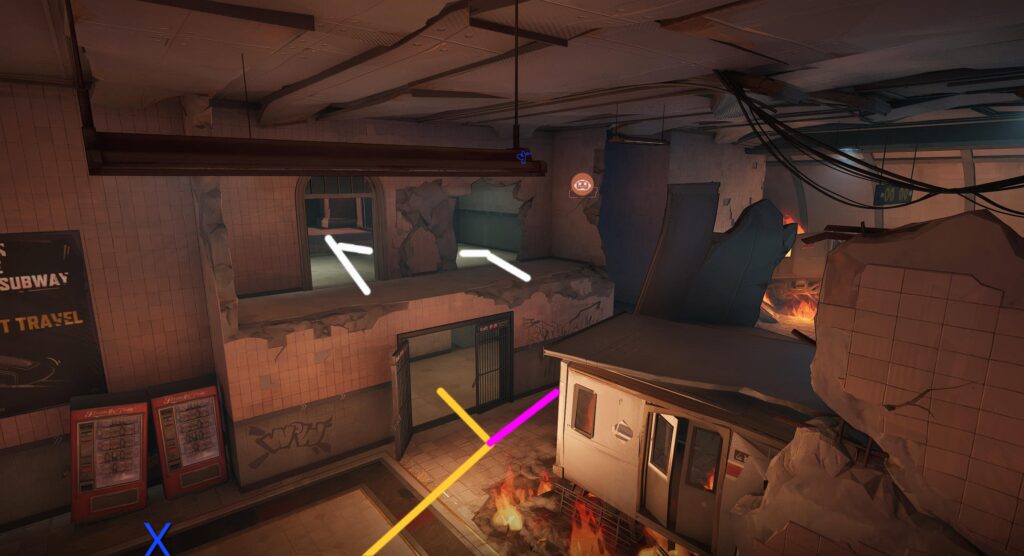
The white path is the end of that elevated route. The X shows where the convoy is (slightly off screen). The pink path let's you flank much more discreetly by not revealing yourself on the very obvious platform. It also gives you extended flanking routes. The yellow path is an alternate route that connects to the convoy, which we will see next.
The new information to note here is the teal path. The X shows a small staircase you can use to access the room leading from the teal paths.
This should give you a nice set of underutilized routes to push the back line with. Defenders can also use this very well as a way to flank behind attackers!
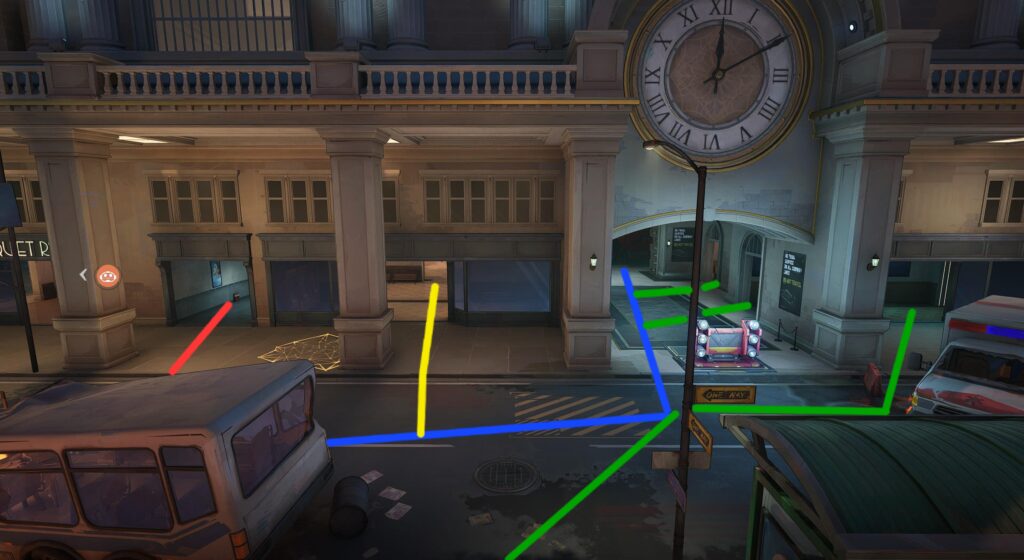
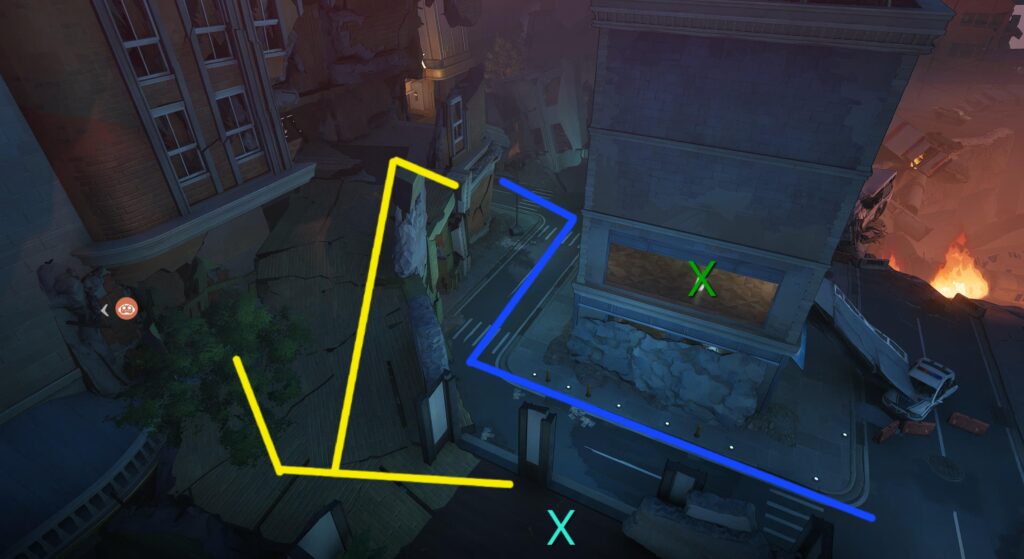
Section 3: Avengers Tower Delivery
After reaching the next checkpoint, the convoy will climb the ramp into Fist Tower, where it will then turn onto the road again. There are multiple paths here to highlight:
- Green: This shows a good route attackers can use to push the objective without running down a narrow hallway under fire. It has an elevated area (marked with X1) and ends at a staircase leading to the street.
- Yellow: While this is technically designed as a path for respawning defenders in the second section, it is now an extra route for attackers to utilize.
- Pink: See next image

Continuing from that sneaky pink path from section 2, this route now pushes from the side to the doors of the section 3 attacker spawn. Divers may use this to put pressure on opponents who are stationed at the top of the ramp to stop the convoy from moving.
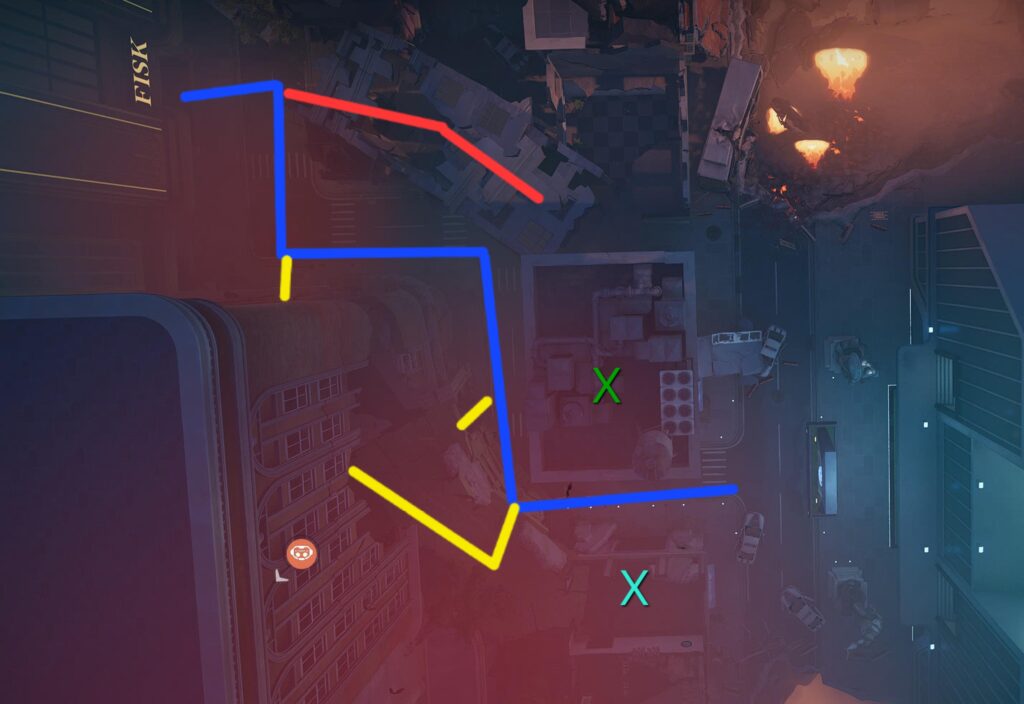
Moving outside to the final stretch, this image gives an top-down view of the area. With the blue still representing the convoy, you can see there are less flanking options than section 2 had. The red path is a fallen building that forms a ramp to the X. If the building rewind is triggered, it will now give you access to walk through the base instead of climbing up. The yellow path gives you both elevated and street level access to attack with. It leads to the X, which is another fixable building you can walk in/ on top of.
As a street level view of the start of this area, you can see the red path up the ramp, and the dotted red path if the building is repaired. The yellow is more detailed in the next image:
Leading directly from the last image, this path branches off into 3 options:
- Climb to the roof from the right side to gain a vantage points.
- Move past the objective route towards the X building.
- Re-connect with the convoy with the leftmost path.
The yellow path should be your diver route, giving you easy and discreet access to the defending back line. Both X and X are buildings you can utilize as well. This area is the end of the convoy route, so getting familiar with these buildings and yellow route can drastically improve your option to lock in the victory.