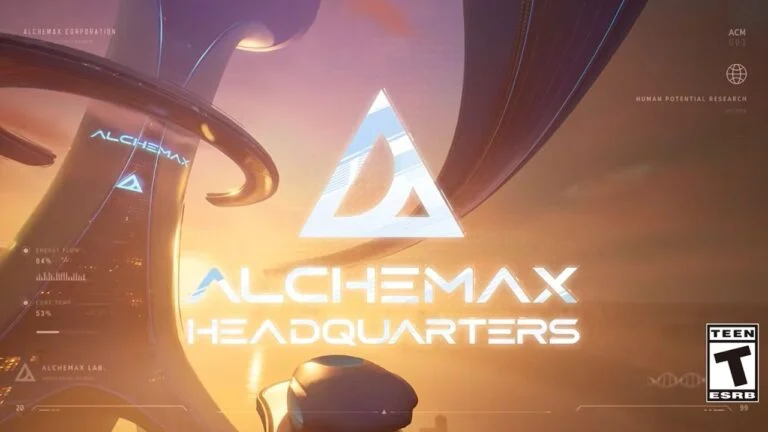
Table of Contents
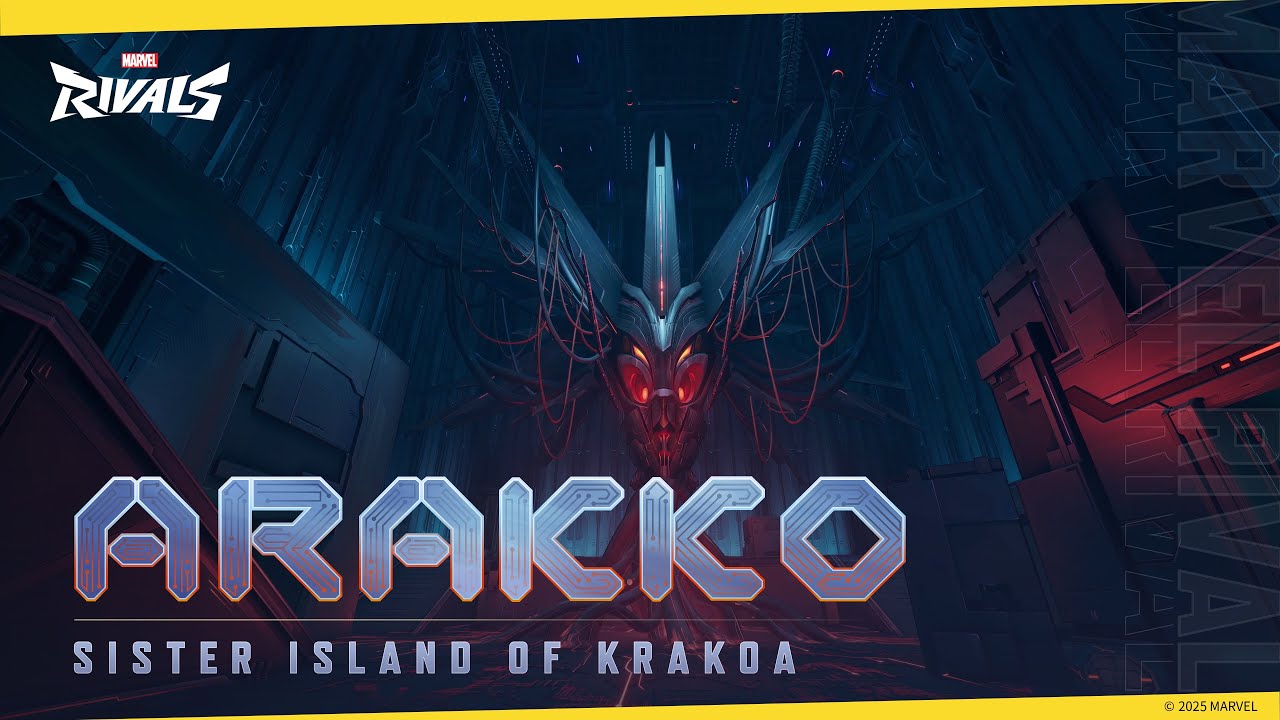
Welcome to our guide to the Marvel Rivals Map - Hellfire Gala: Arakko! Here, we will explain the layout of the Map, and learn about each section so you can take advantage to defeat your enemies.
After the Hellfire Gala was crashed by Ultron's surprise attack, the mutants of Krakoa faced some of their toughest days yet. Now, Ultron has stolen Cerebro, evolved into even more formidable X-Tron, and retreated to his new stronghold: Arakko.
Once Krakoa's sister island, Arakko has lost all its vitality, transformed by Ultron into a cold, merciless, mechanical world. But the fight isn't over. Our heroes, regrouping after their setback, must now join forces with Krakoa to save Arakko.
Arakko Map Type: Convoy
Arakko uses Convoy mode, where one team escorts a moving vehicle (the Avatar of Krakoa on this map) to the end of the map while the other team tries to stop them. The attacking team must escort the Avatar of Krakoa through two checkpoints to reach the final destination at the Great Ring. The map is divided into 3 sections, each having a checkpoint to extend the round timer and move respawn points.
In this guide, we will break down different routes you can take in each section, as well as highlight different portals you can utilize and important breakable walls. It will be from the perspective of the attacking team, but you can utilize these same routes on defense as well.
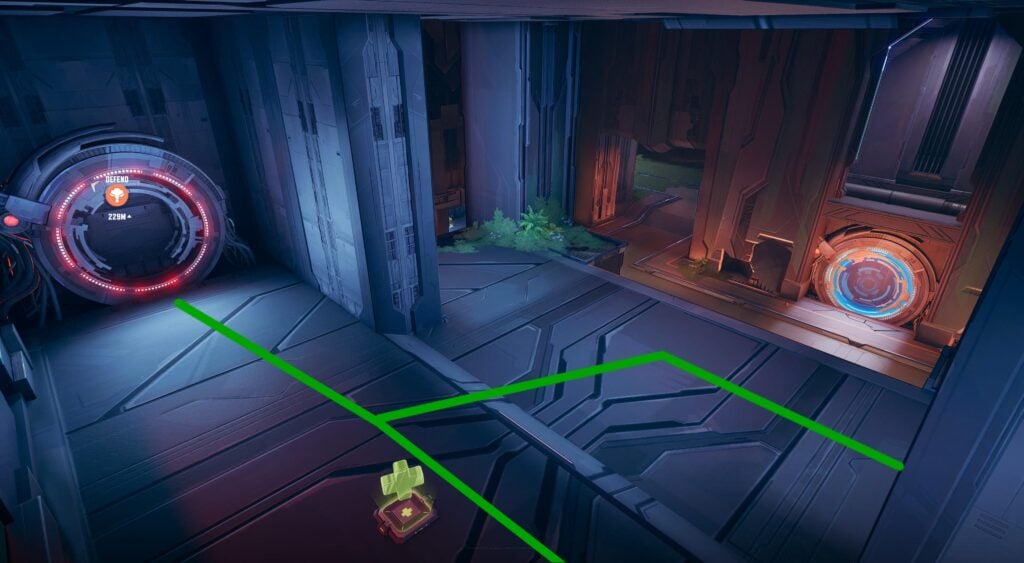
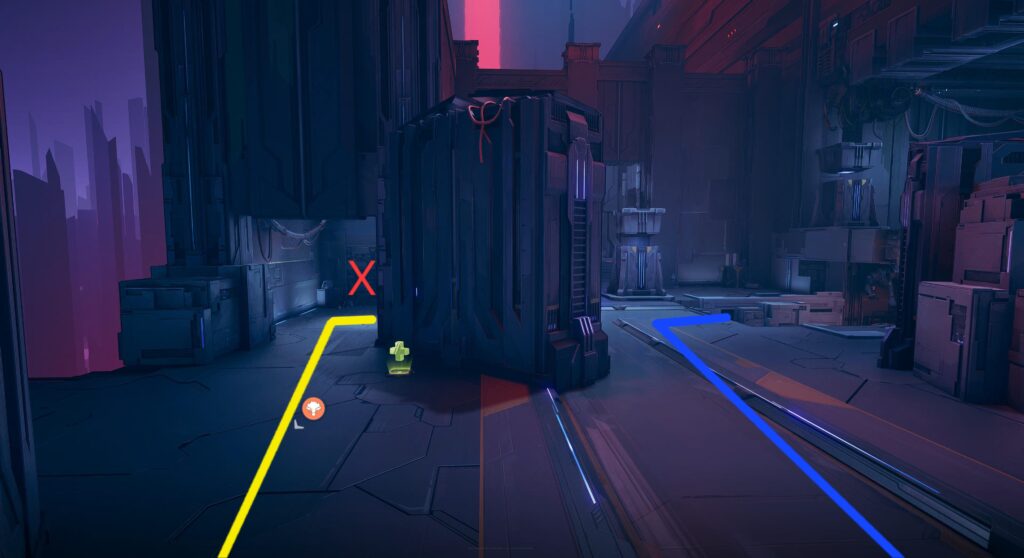
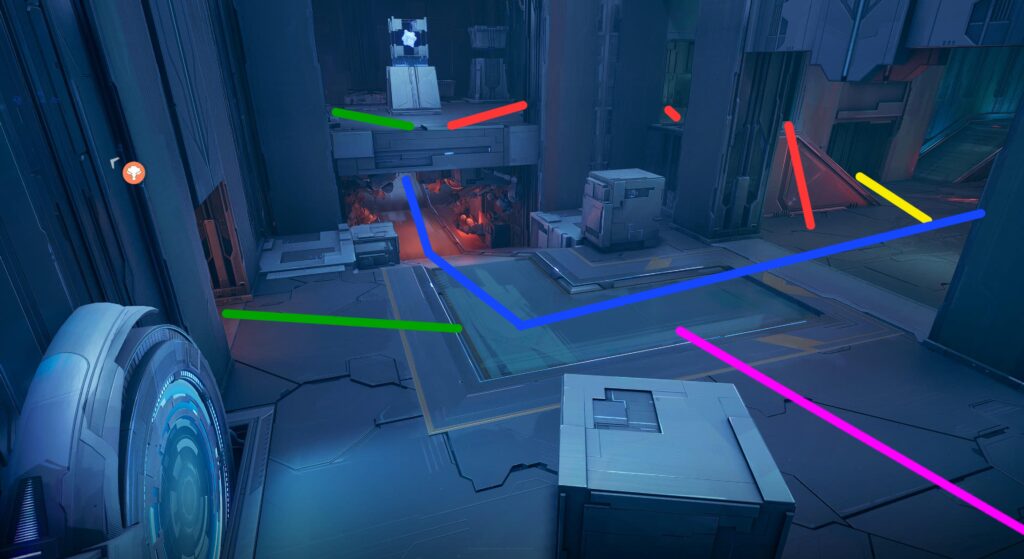
Section 1: Securing the Avatar
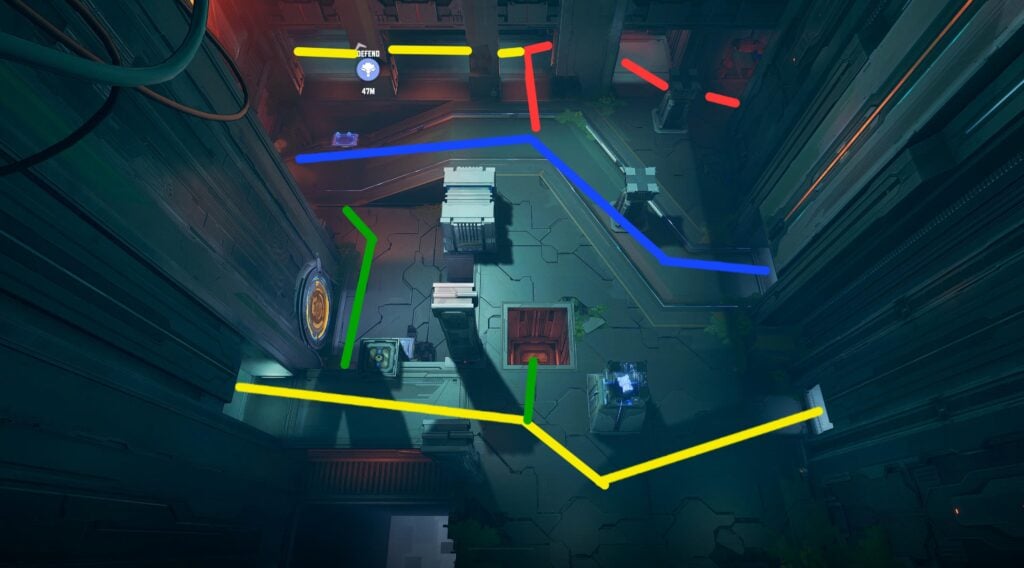
This is a top-down view of the attacker spawn, and the starting objective. These multi-colored lines represent different routes you can take, and will be consistent throughout different images. Here's a basic overview:
- Blue: The main objective path. Most players will follow this naturally as the objective moves.
- Yellow: This lesser-used route moves around the outside flank to reach the bridge thay passes over the objective. It's a great way to pressure opponents on the bridge or for divers to flank with.
- Red: On the opposite side, this route takes a detour under and behind the objective, giving quick access to the end of section 1. Its great for flanking, or a quick path back to the objective if you die with the objective at the end of the section.
- Green: This route begins by jumping down into the square hole in the floor, or using the offshoot next to the orange portal. This goes under the yellow path and wraps behind the main objective path.

Here's a closer view of that lower green path. Not only does it have a health pack, it has a safe place to utilize that orange portal (we'll show the other end of the portal shortly). Divers will be the main players using this route.
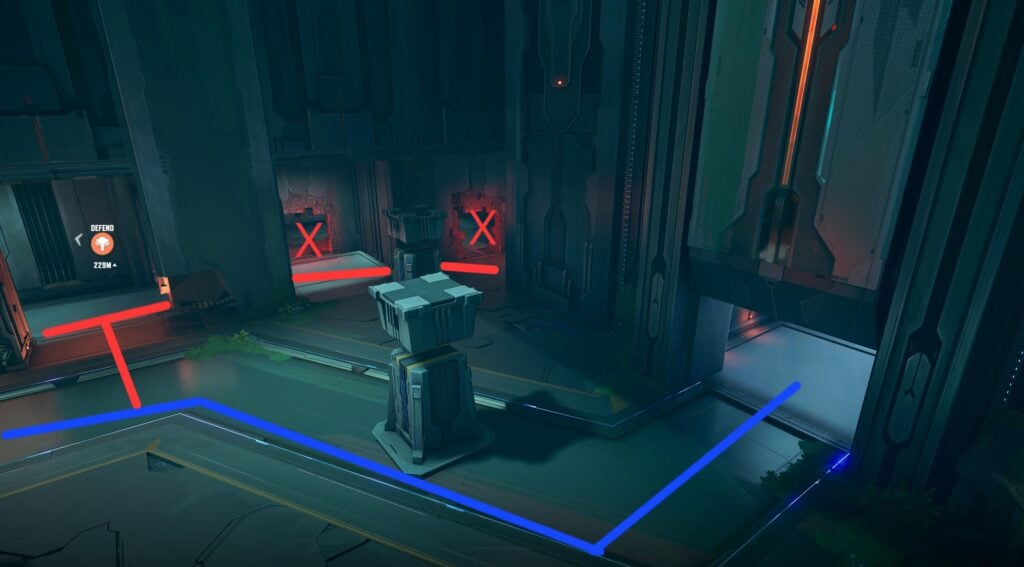
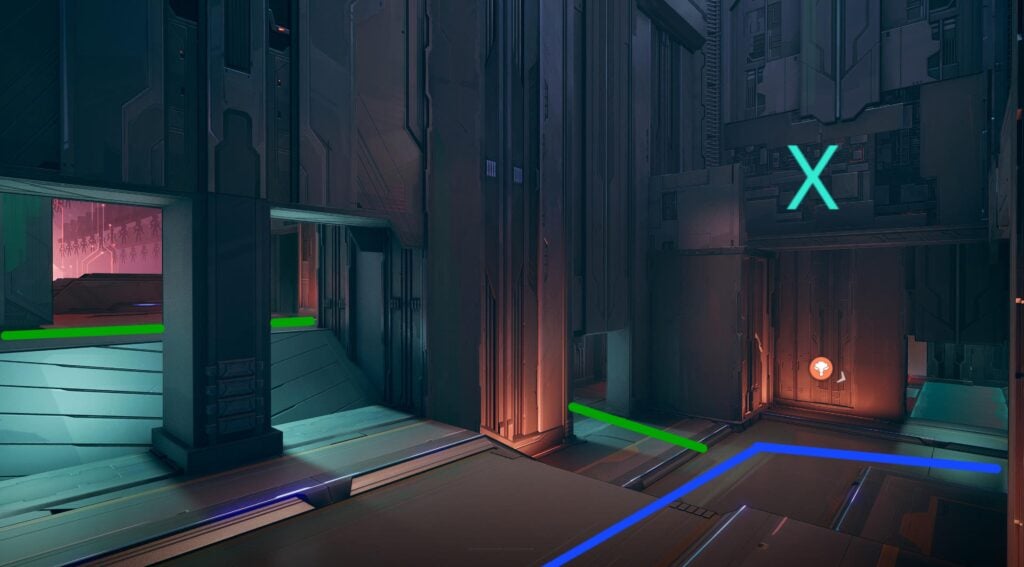
Back on the surface and at the spawn, here's a closer look at that red route. You will notice the 2 X marked on this route, which hides a small room you can utilize by breaking down the walls.
It doesn't offer much literal value besides a health pack. It does give you a small mixup option when leaving the spawn. Defenders can also open the rightmost X wall and establish a discreet hiding place while you wait for opponents to pass by.
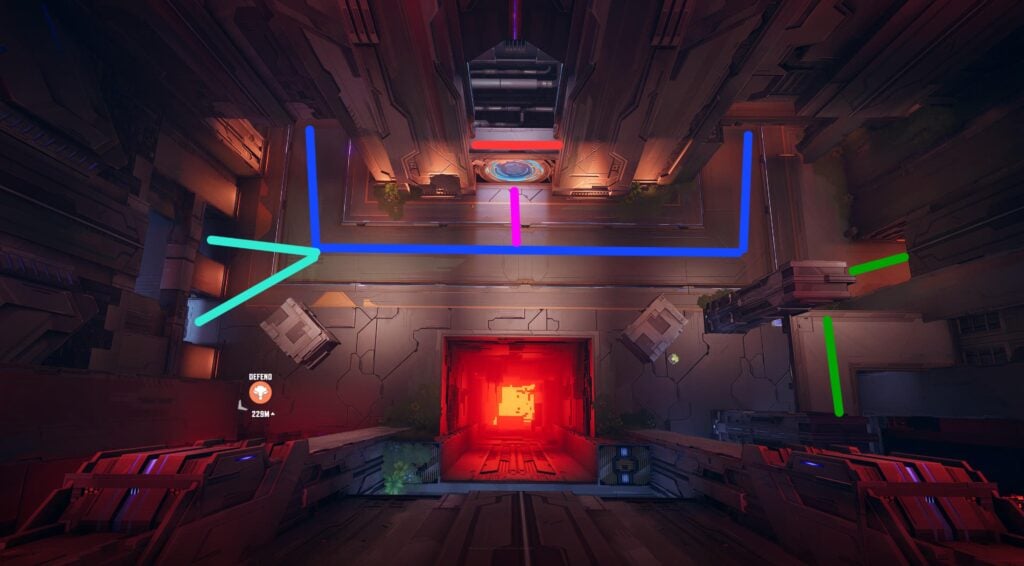
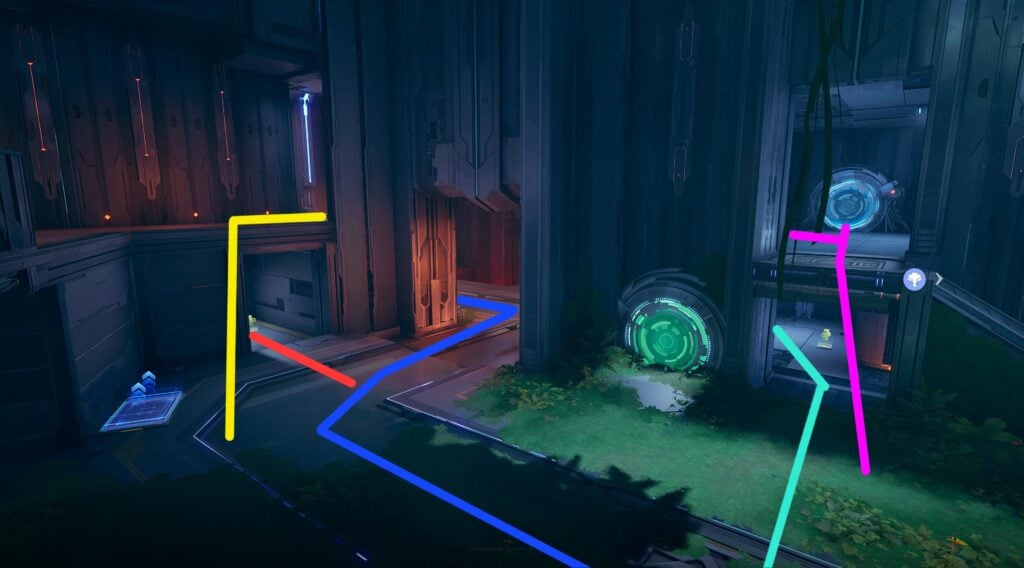
Moving onto the next room, you can see the blue objective path again. The green route uses a jump pad to move to an upper balcony (if you don't change routes in this room). The teal path is a quick alternate route next to the objective. That short pink route connects to a teleporter, which takes you to the upper floor above the teal route. That big lava pit in the center of the room is a fall hazard. It's perfect for getting sneaky kills with characters like Spider-Man and Invisible Woman.
Back at the upper green route, you can see the vantage point you get here. It also holds 2 different portals! One is the ending of the orange portal from the attacker spawn. The other portal (opposite of the portal in the image), comes from the green portal at the end of this section. This is a great vantage point for snipers, especially if you can get to the orange portal and flank early on.
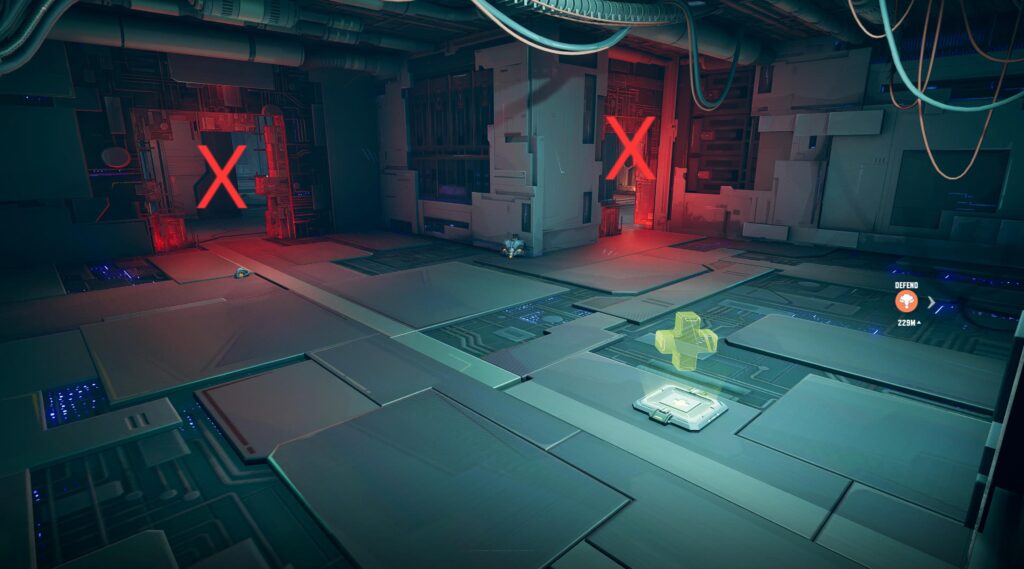
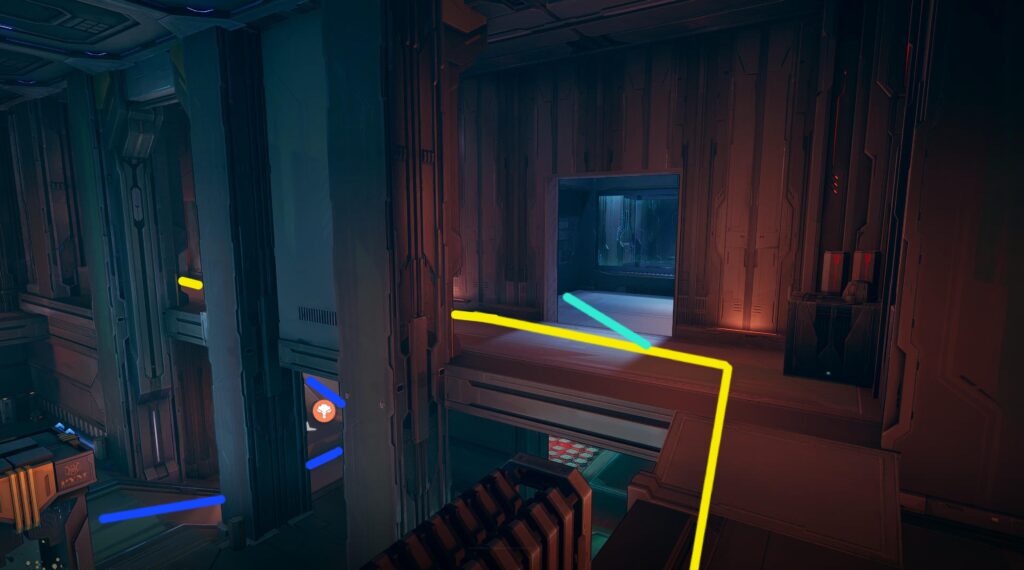
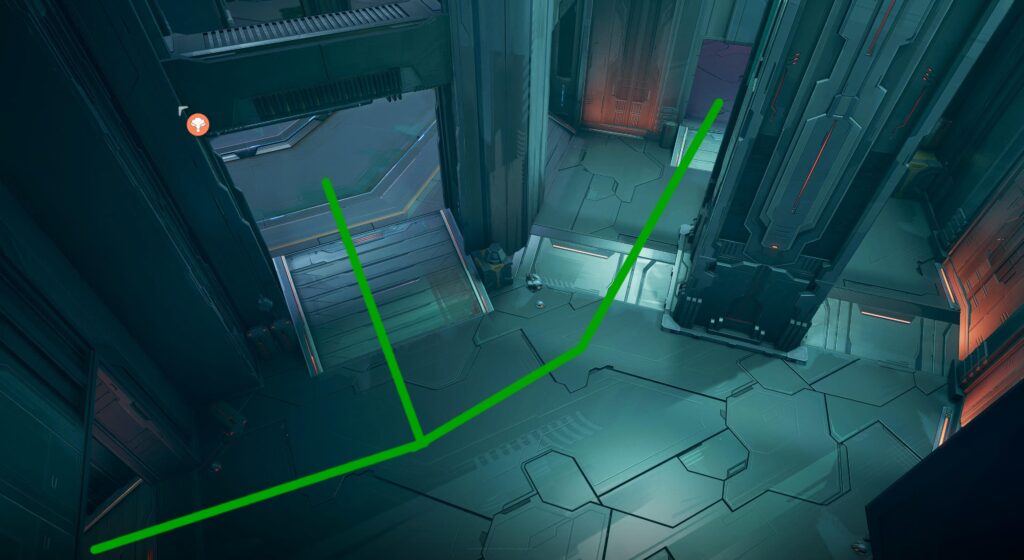
And onto the final room of this section, you can see where each of these paths come to an end. That green portal connects to that upper balcony from the green route that I mentioned before. The yellow route wraps around the upper floor and leads to this room as well. As for the red route, the next image gives a closer look on how this path connects to the main spawn:

While it's noting too complicated, players tend to forget this path even exists. It also holds a health kit, making it a good retreat option.
Section 2: Ultron's Factory

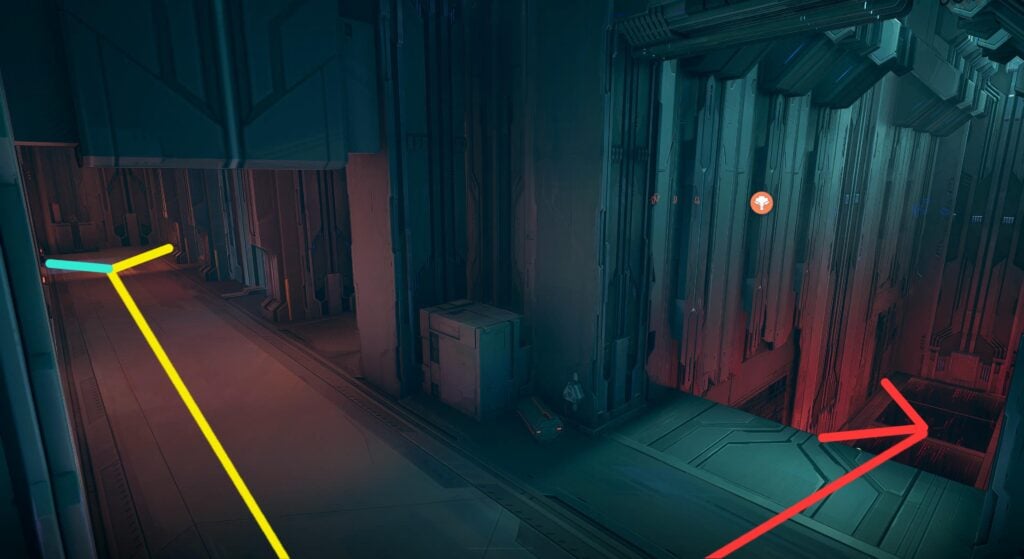
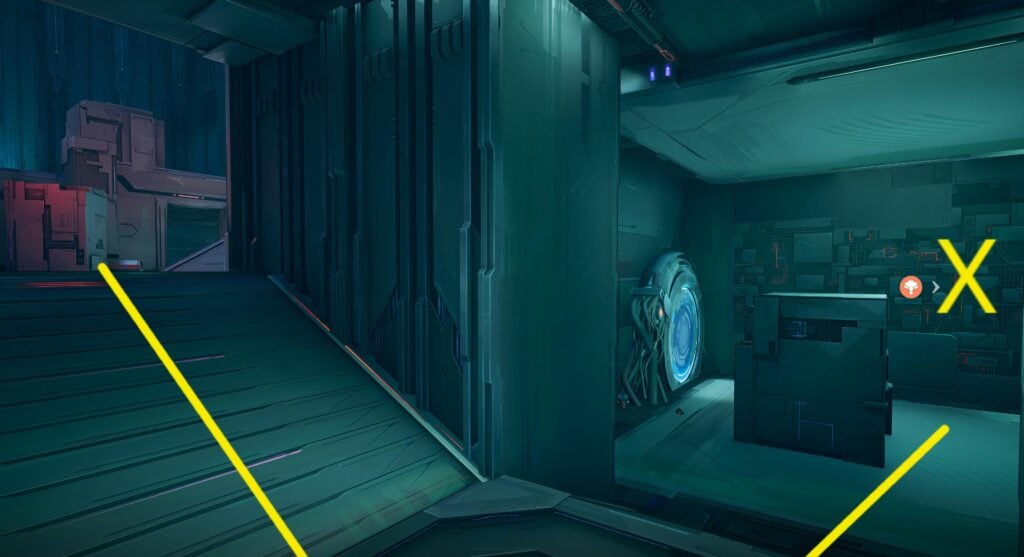
This middle section of the map takes you through the inner workings of Ultron's drone factory. It's a lot more closed in than the other two sections, making it trickier for fliers (but better for divers). This image is at the beginning of the section. The blue route will continue to be path the objective takes as your team escorts it. The yellow route is the right, upper level that runs parallel to the objective after crossing over it. The X are breakable walls that reveal a hidden path (which we will show you in a different image).
At the start of the yellow route, there is a small room along this teal path. You can destroy the wall in this room to gain a vantage point over the objective. If the defenders are putting a lot of pressure out with their high ground, this spot can force them to split their attention between the open wall or the objective below.
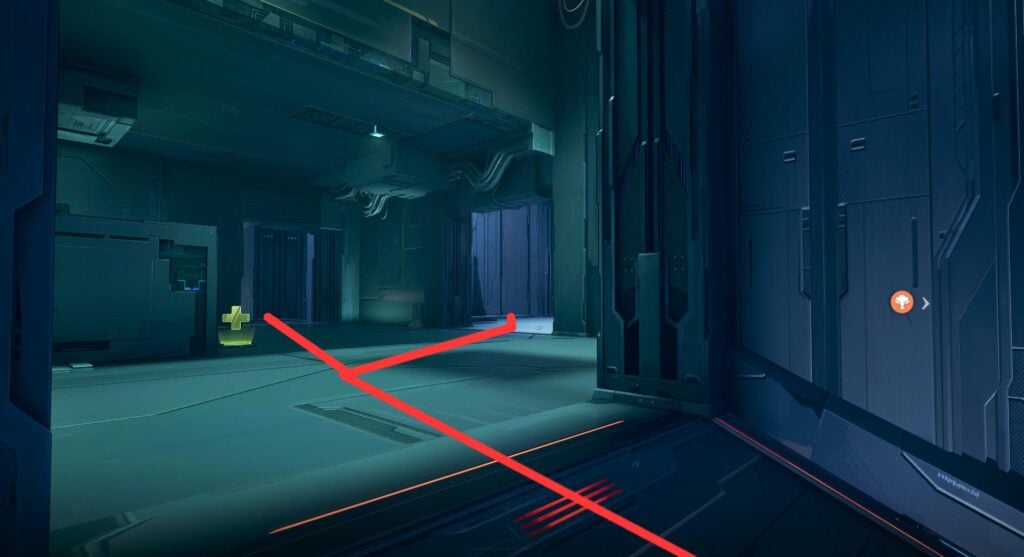
Now for those 2 X from the start of the section. This shows the other side with that hidden path. It connects back to the yellow route on the next floor. Defenders can also use this as a sneaky way to flank the attacking team.
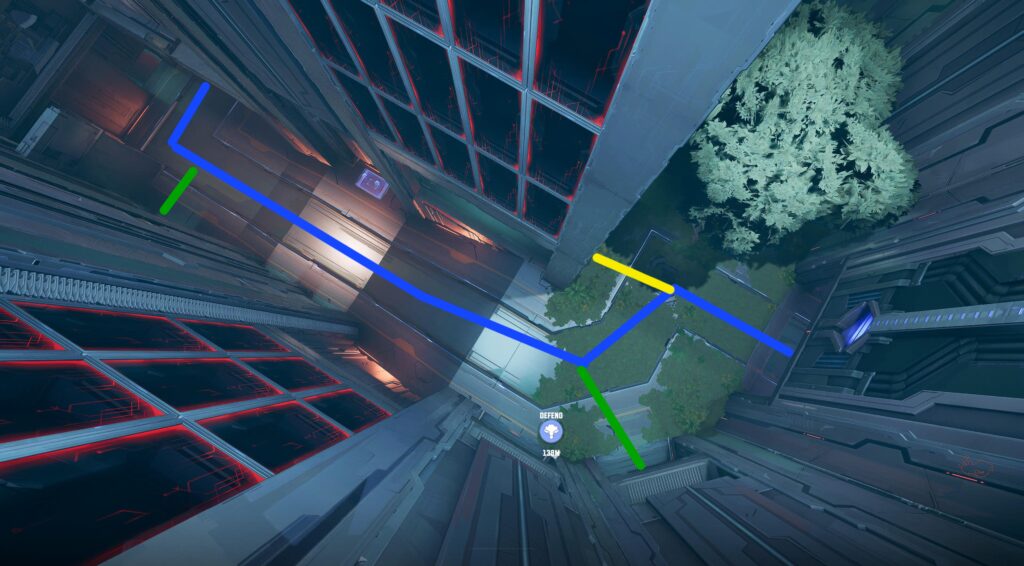
As the objective starts to climb that hill, you can move around the side to this green route. It's fairly open, but it can give you mixup options to break through the defenders hold. That X shows the breakable wall from the teal path.
If you use the green route, this shows where it wraps around the objective to flank, or to continue through to the final section of the map. Defenders will very often use this as the first choice to return to the objective, so use it cautiously.
At the end of this section, this shows a top down view where all of the routes reconnect. Its a fairly small section to push through, so there isn't a ton of different options to choose from. It is good to highlight here the jump pad on the ramp up on the blue route. It can boost you up to the upper yellow route if you need it.
Section 3: Reaching Ultron
Here is the start of the final section. It's much wider than the last section, so you have more options to utilize again. Like before, the blue route is the standard objective path. The green route continues from the previous section, and cuts through a small corridor to access a few options. Yellow also continues from the previous section, but it also sits right next to the defender's final spawn area. Finally, the red path takes you around and up the left side of the map, and it begins at a small breakable wall branching from yellow.
From a ground level view, this angle shows that breakable wall that opens the red route. Of course you can just walk around the wall and get there all the same, but the room it opens gives you a bit more cover than running in the open.
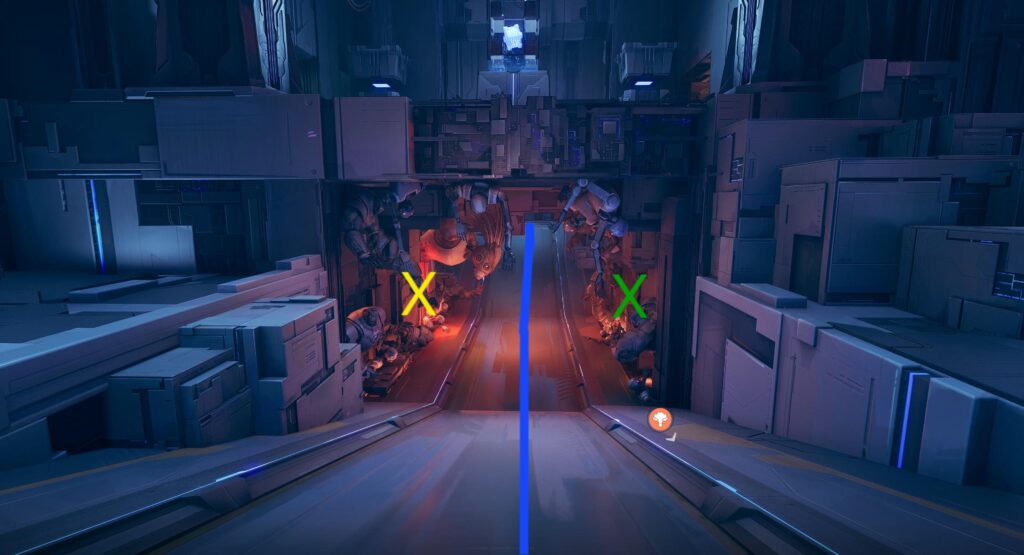
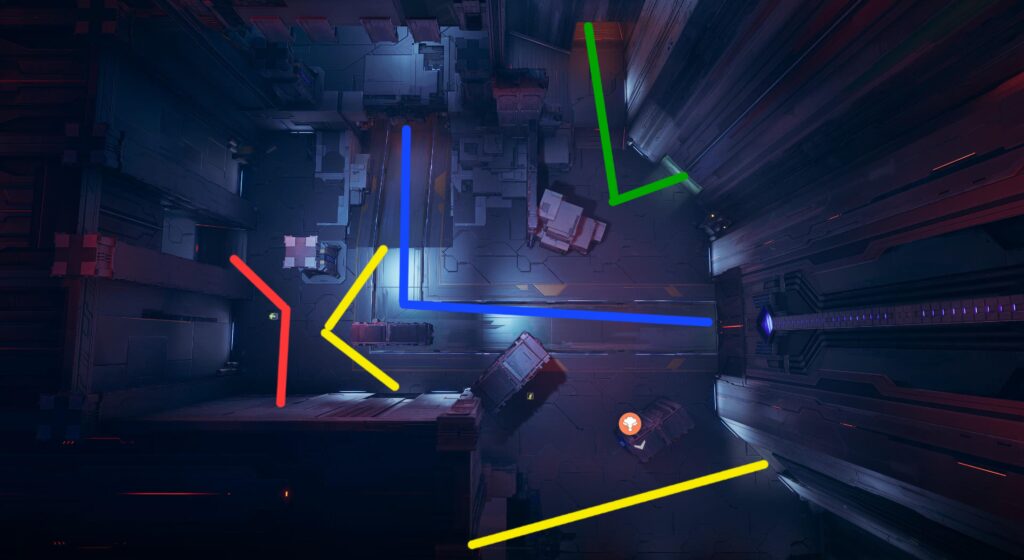
Heading down the hill with the objective, you will see all of these Doom and Ultron bot statues. The X and X highlights breakable walls that correspond to routes on the other sides.
Most notably, the X leads to this new yellow path that can flank the objective. That blue portal also puts you right behind the next turn the objective will make (which you will see coming up).
If you follow the red route, you will climb a ramp to this area above the objective. The left fork takes you to the end of the section. While the right fork goes directly above the objective and connects with the green route
On the other side of that narrow objective path, the blue route takes a sharp turn as it enters the end of the final section. You can see where most of the routes come together here, showing all of the options you have to break the opponent's defenses. The other side of that yellow route portal is also here at the bottom left. The new pink route you see here is a side corridor that simply loops around to the final room.
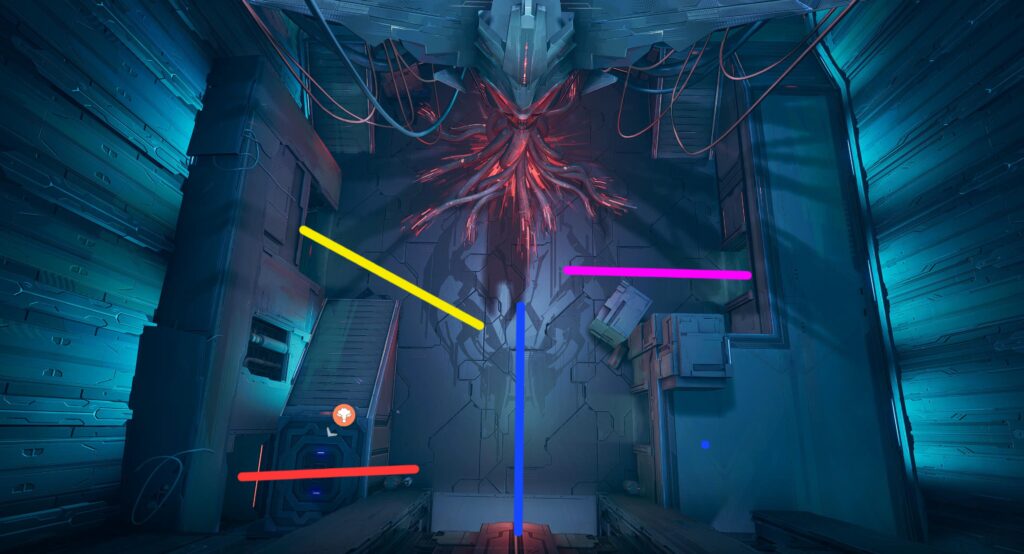
Finally, the objective ends in this room, allowing attackers to secure the win. The ends of the red and yellow routes are the same as the last image, but this gives you a better on how they connect with the final room. The end of the pink route can also now be seen here. Defenders can make better use of this image to see what routes you can take from the spawn to best position yourself against attackers.
All Arakko Map Achievements and How to Complete Them
Here are all four achievements available on the Hellfire Gala Arakko map:
- Whispers in Pieces (5 points) - "Shatter 1 robot on Robot Wailing Wall in Arakko." Find the Robot Wailing Wall (easier for defenders, located after second checkpoint for attackers) and destroy one of the robots mounted on the wall.
- Arakko Goes Analog (5 points) - "Purge Ultron's virus in Arakko." You must be on the attacking team and successfully escort the Avatar of Krakoa all the way to the end of the map while winning the match.
- Digital Ecosystem (5 points) - "Restore vegetation to the mechanical surface in Arakko." You need to be on the attacking side for this achievement. The vegetation appears every time you reach a checkpoint - you'll see an animation of a tree growing and grass spreading on the ground.
- Days of Future Past (5 points) - "Erase Ultron's existence from the timeline in Arakko." You need to be on the defending side and win the match by preventing the convoy from reaching the last checkpoint before the timer runs out.