Table of Contents
Welcome to our guide to the Marvel Rivals Map - Klyntar: Symbiotic Surface! Here, we will explain the layout of the Map, and learn about each section so you can take advantage to defeat your enemies.
Stirred awake by the Timestream Entanglement, Knull taps into Chronovium to spread his dark divinity across the gods and free himself from his prison planet: Klyntar.
Sensing the looming threat, Venom rushes to consume the severed essence of the god before Knull fully revives!
On a mission from Shuri, the Milano malfunctions and crash lands in the ruins of the Agents of the Cosmos. Now, the Guardians of the Galaxy clash with Venom over how to use this dark power. Will they decide to join forces against Knull or will true evil ultimately emerge victorious?
Map Type: Convergence
Klyntar is domination / convoy hybrid map. It requires the attacking team to capture the convoy, then escort it to the other end of the map in order to win. There are 3 checkpoint sections, consisting of the capture point, the first half of the convoy path, and the second half of the convoy path. This guide will cover all 3 sections, highlighting different routes you can utilize, as well as other helpful tips and tricks.
Everything will be written from the perspective of the attacking team. You can still utilize these routes on defense though.
Section 1: Capture the Symbiote
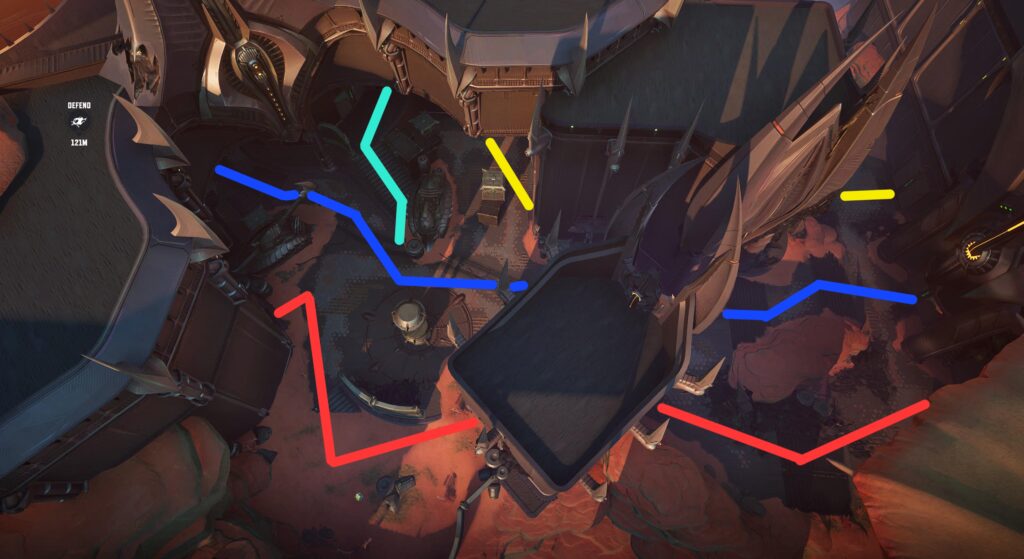
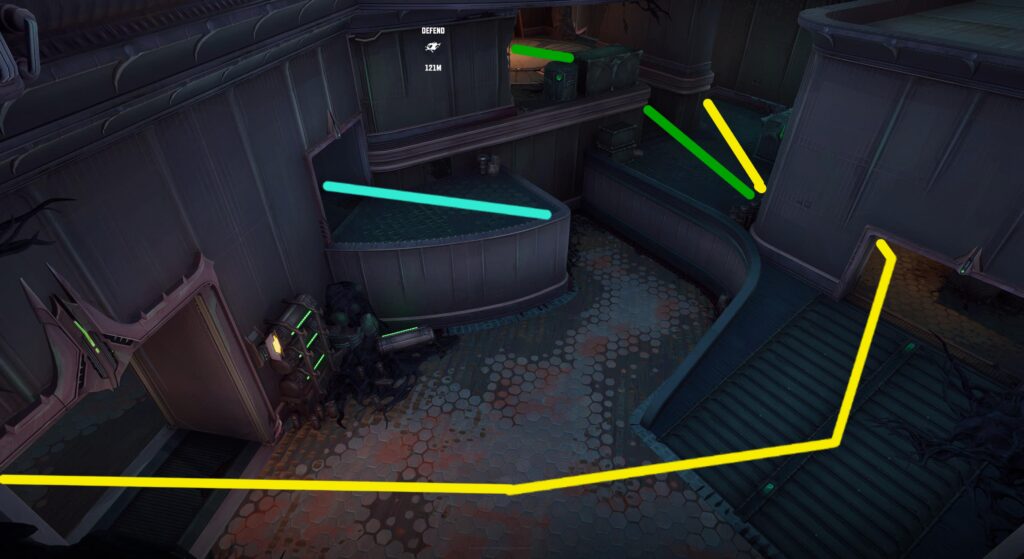
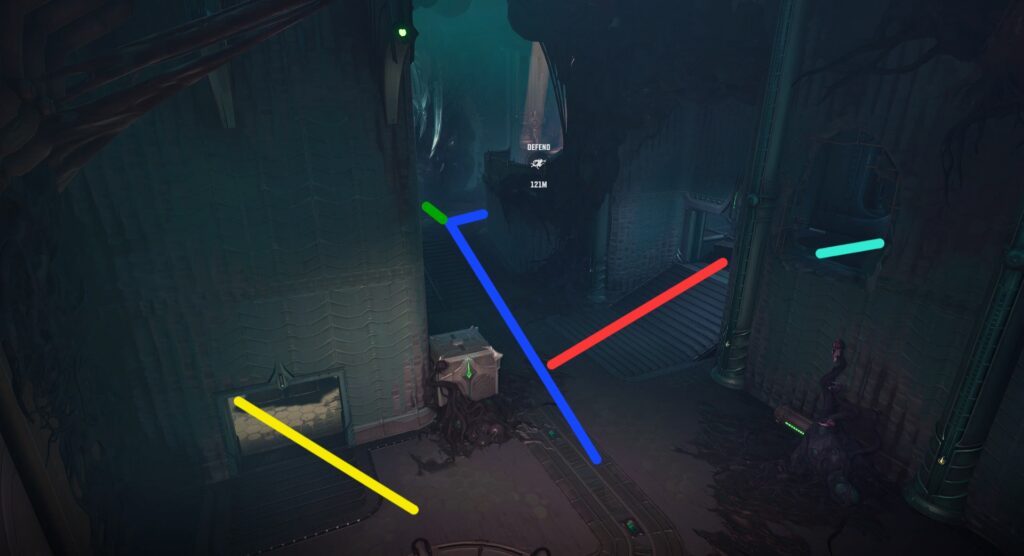
Here is an aerial view of the attackers spawn point. There are 3 separate exit doors that each take you down unique routes. The map is very open in this section, so you can very easily swap between routes. The colors represent the following:
- Blue: The typical route players naturally take directly to the objective
- Red: This runs parallel to the blue route, but aims to be a bit more discreet without wasting time
- Yellow: The long, wrap-around route that moves around the objective to approach from a unique angle. Though it does take longer to reach the objective
- Teal: This is mainly a connecting path between Blue and Yellow, but it can offer a few mix-up oppertunities
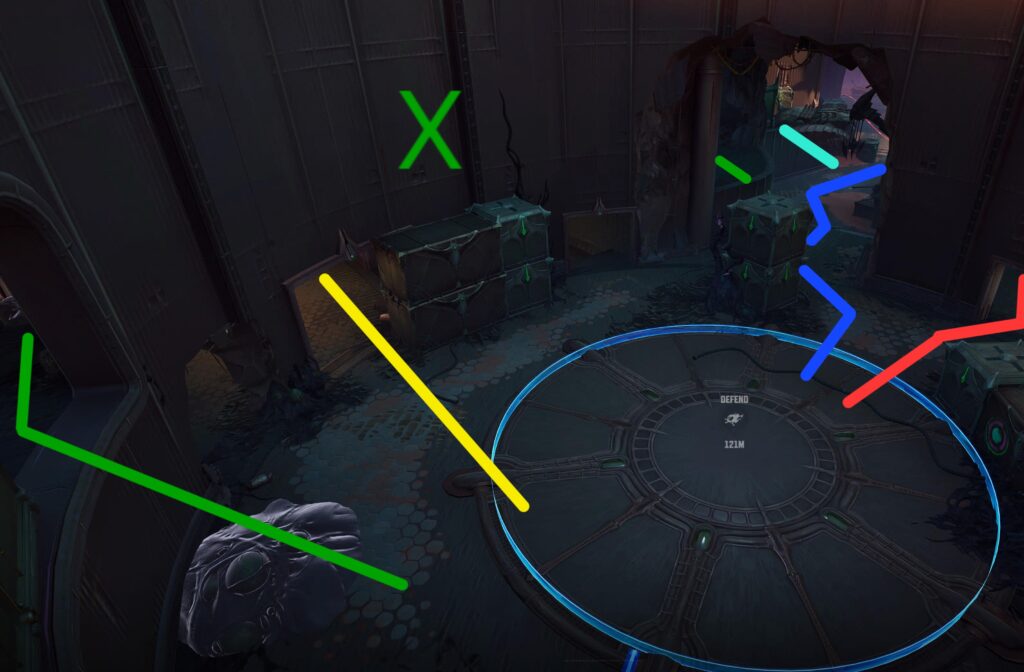
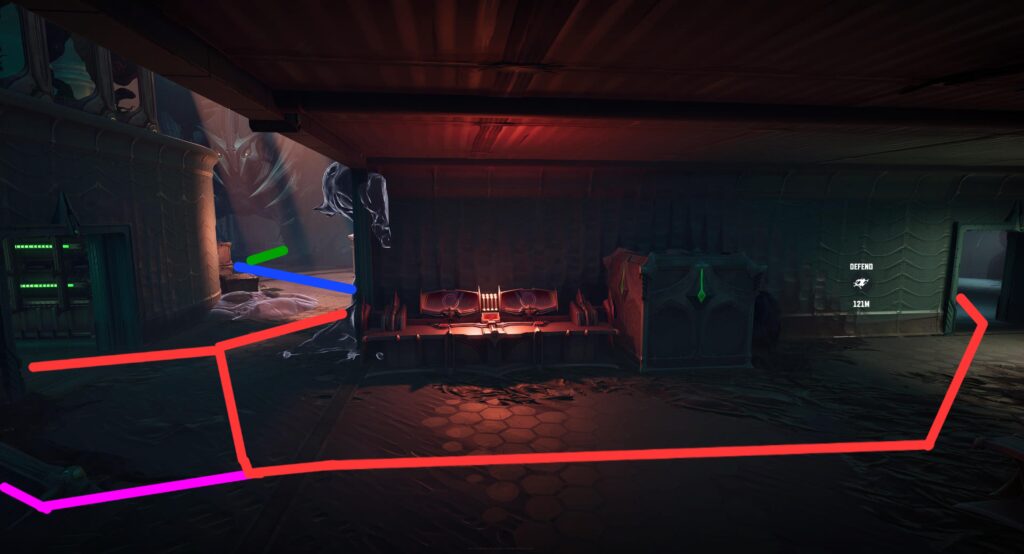
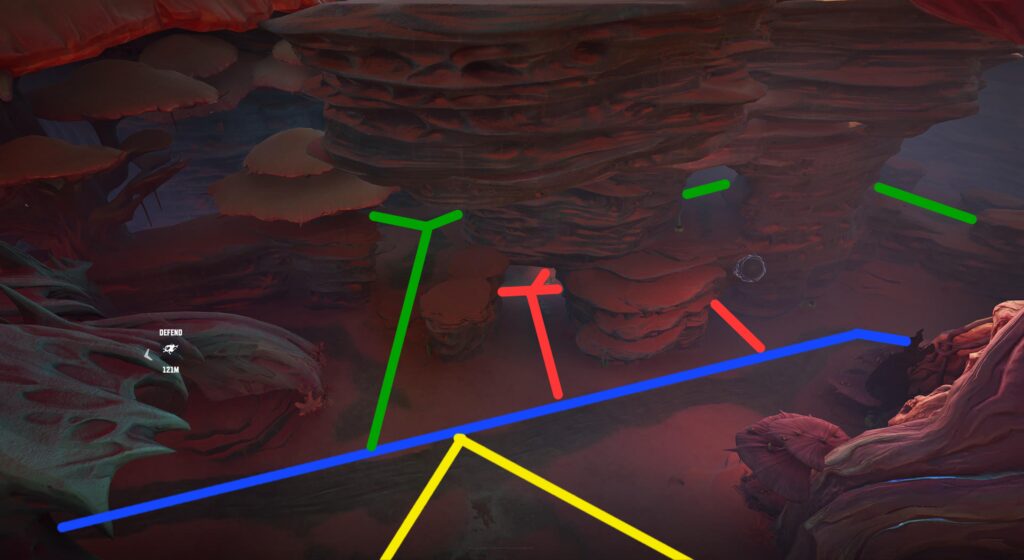
This angle shows the objective point, where the paths all end. The only route that differs from the previous options is the green route and the X, which we will cover in a moment.
The red route is the most common secondary choice for players, so we won't spend long talking about it. It does hold a health kit (not pictured) if you go off route to the corner of the room (at the bottom of the image). You would use this path if you are trying to attack the objective head on, but the openness of the blue route is too exposing.
On the opposite side of the map, the wrap-around yellow route move way out of sight line to the objective. A branching green route takes you to the second floor, where a few options are located. You can see how the teal path bridges Blue to Yellow here, but it also gives a couple of extra options. You can jump up the ledge and skip directly to Green. You may also use this as a faster way to reach the end of yellow, without making such a wide sweep. The small room in the upper right corner also holds a health kit, perfect for divers. You would utilize this area if you need to reach the enemy backline from behind.
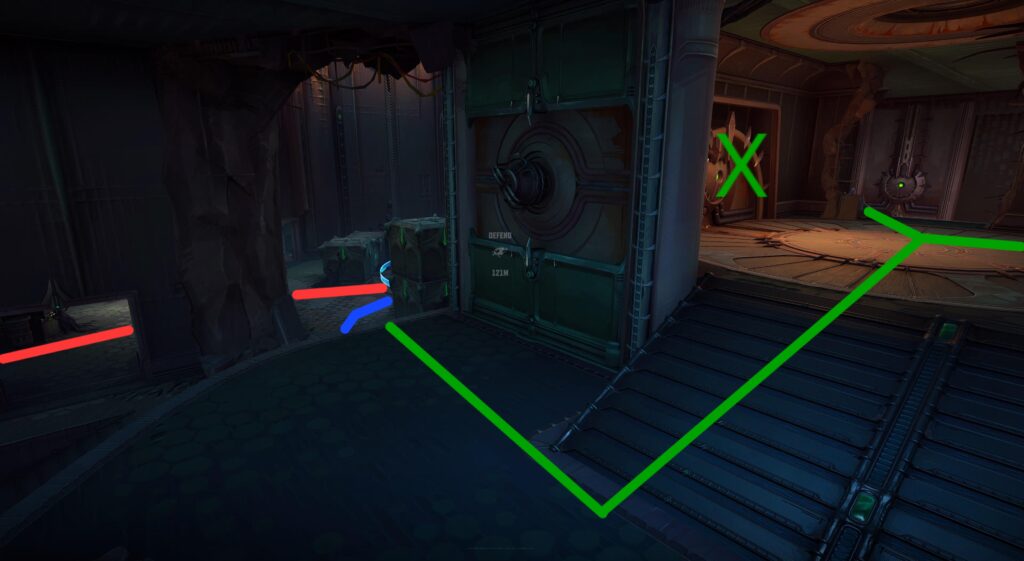
The upper green route gives you a few options:
- Left: Re-connects with blue, but with a slight high ground advantage with a wall coverage to shelter by
- Right: A symbiote bridge you can interact with to circle directly behind the objective, but on the second floor. This gives you high ground advantage over opponents
- X: This marks a destructable wall, which you can see the other side marked on a previous image. Breaking this can give you a very unique angle on the objective while remaining well protected. It's perfect for Snipers to quietly pick off low hp targets like healers.
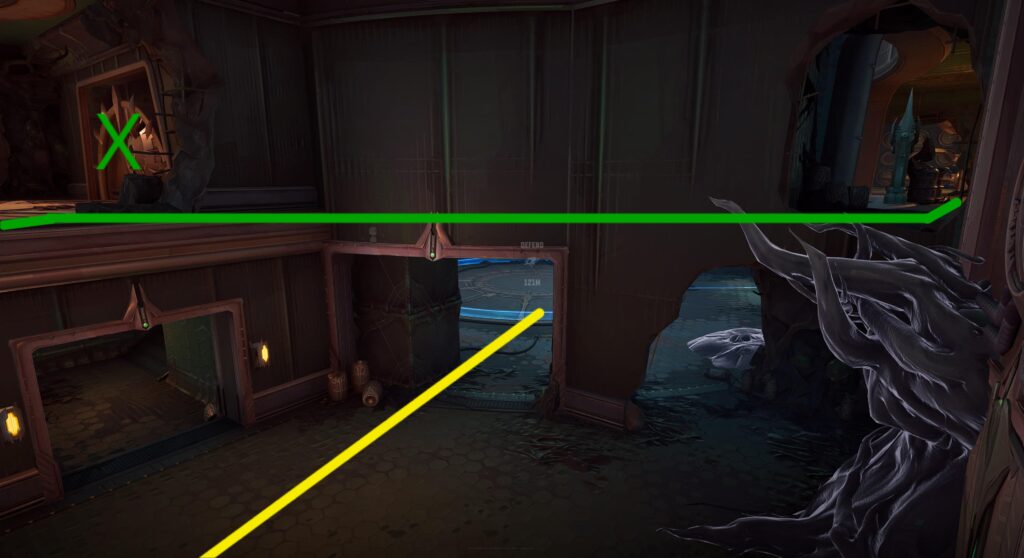
To get a better understanding of that symbiote bridge, here is the end of yellow at the objective. That grayish structure on the far left is a symbiote you can shoot or melee. Doing so will extend a bridge for a few seconds that you can cross. Additionally, that small room to the left of the yellow route (not marked with any lines) holds a health kit and a slightly different angle on the objective.
Section 2: Interior Escort
The second portion of the map takes place inside a building. From here, routes continue from where they did in the previous section. Green now transitions from 2nd floor to ground floor, and cuts around the right flank to approach the objective. Similarly, Red continues the left flank and primary runs parallel to the blue route. The pink route and that tiny yellow route are new options that we will get into shortly.
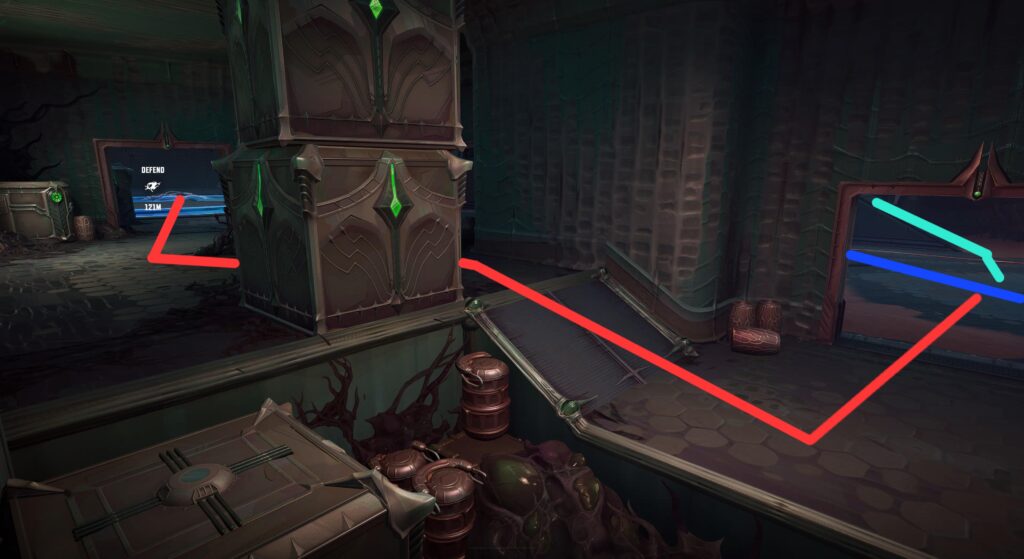
This is the hallway that the red route uses as the left flank. It offers a choice of reconnecting with blue, climbing up a ramp to pink, or continuing down the hallway. If you see the connecting path back to blue, there is another symbiote you can shoot on the left portion of the wall. Activating it will create a wall that cuts off the red to blue connection for a short time. You can use this as a quick way to cut off opponents who step too far back into this hallway.
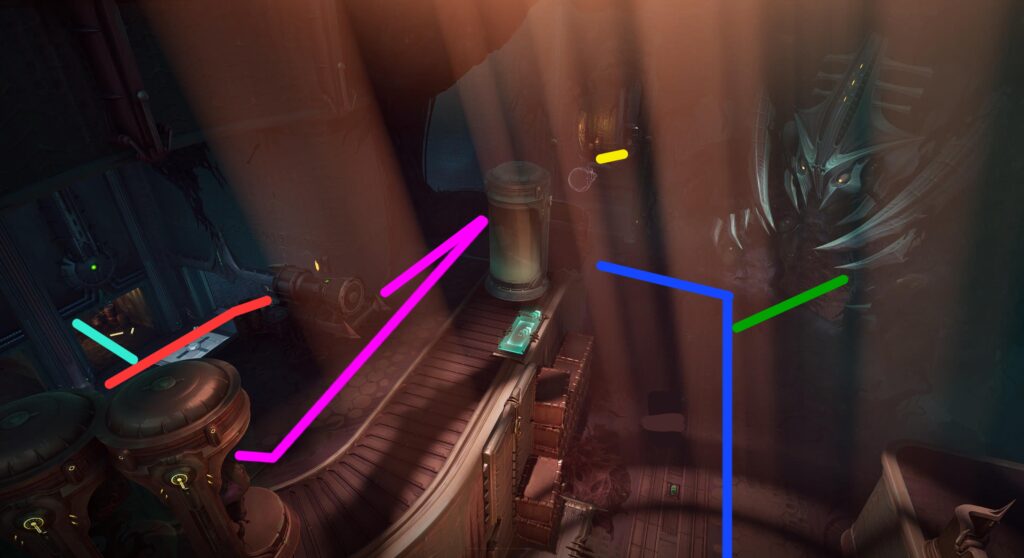
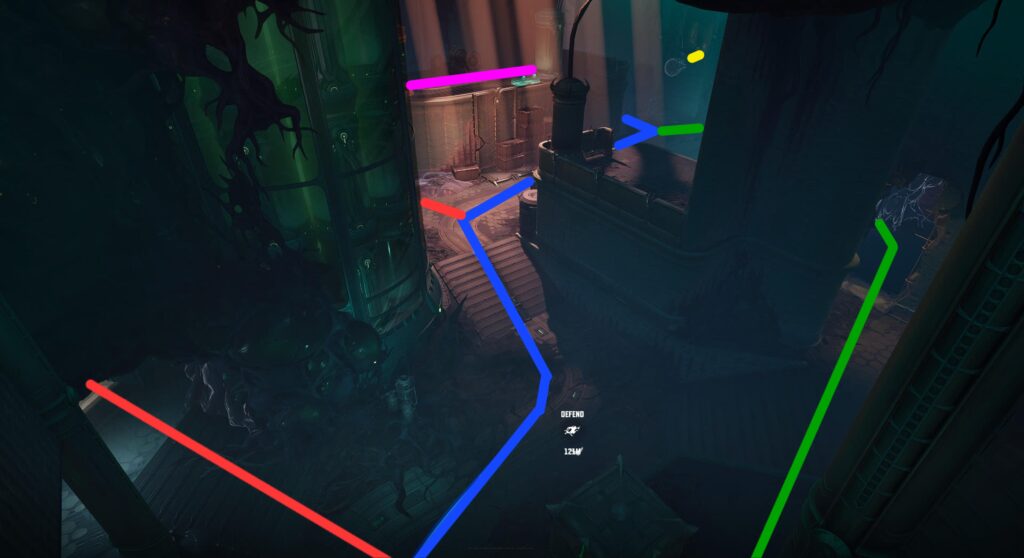
This top down view sits just above that symbiote wall we just mentioned. It shows the standard blue route, as well as the new upper pink route, which then can go back downstairs to reconnect with red again. The teal path now branches out from red, which takes you to an upper balcony above the final room of this section. You can see the green and yellow routes here, and the next images will cover them more closely.
There is also another symbiote piece you can shoot on the wall, just below the yellow route's doorway. Shooting it will create a bridge that connects the pink and yellow routes together above the blue route.
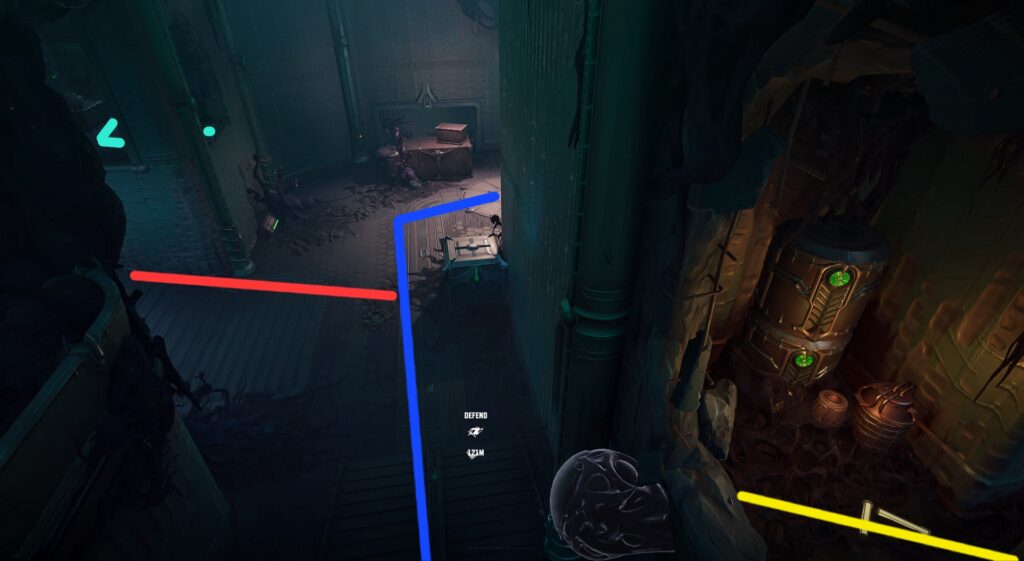
The green route moves through this narrow hallway, giving a nice shortcut to the back portion of blue. It also connects to one end of yellow, which takes a ramp upstairs and connects to that symbiote bridge.
In the final room of this section, you can see where each route ends. That teal route is that balcony view you can utilize for high ground advantage. The yellow route continues from the last image, and the next images will give a closer look at that room.
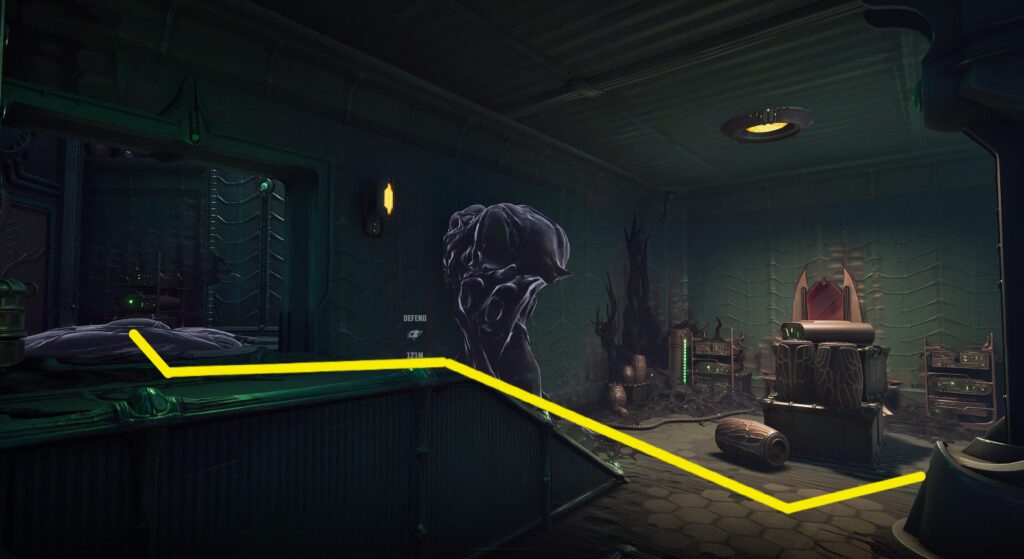
On the upper floor of yellow route, you can jump down and follow this path to the objective room. The symbiote pile on the floor at the end of yellow can be shot/ punched to create a quick elevator back to the upper flood. A second symbiote sits at the bottom of this ramp. Shooting it will extend a wall across the entire room, completely cutting off access to the objective for a short time. You can climb or fly over the top if needed, but it does make you exposed in the process.
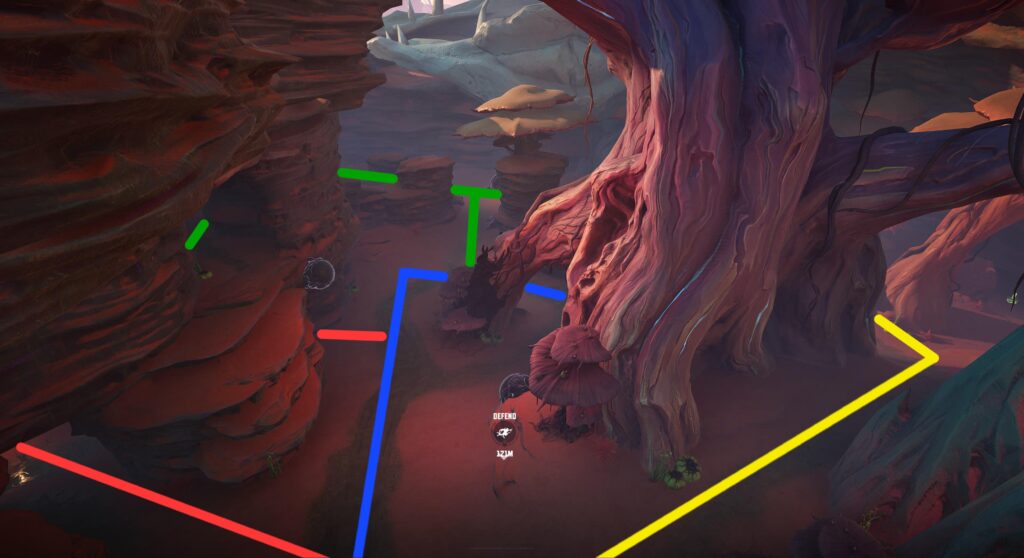
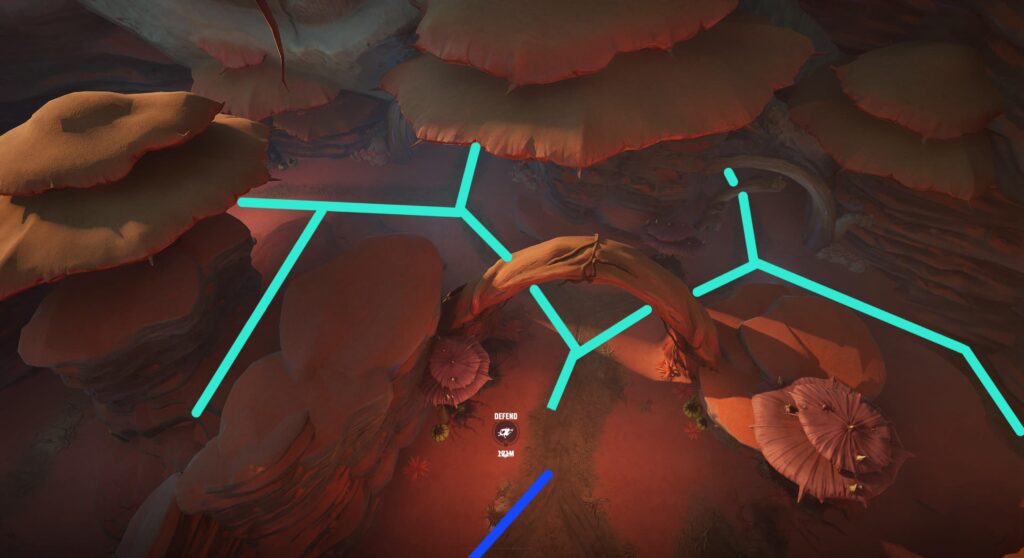
Section 3: Outdoors to the Final Stretch
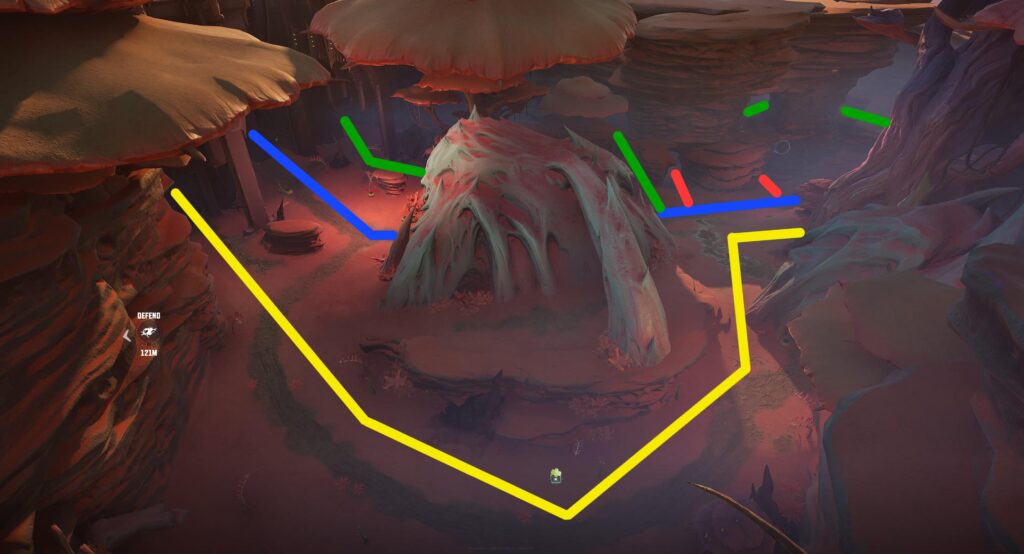
For the final section of this map, we head back outdoors. From here you have the following options:
- Blue: The continued standard path
- Yellow: Continuing from the previous yellow route, this wraps to the open outer edge of the map to circle around the objective
- Green: Leaving directly from the new attacker spawn, this hugs the cliffside for the left flank route
- Red: A small cave under green that offers a few mixup options, as well as shelter
Flying characters can also move over the structures in the center here, giving you an opportunity to attack below with cover readily avalible to retreat to.
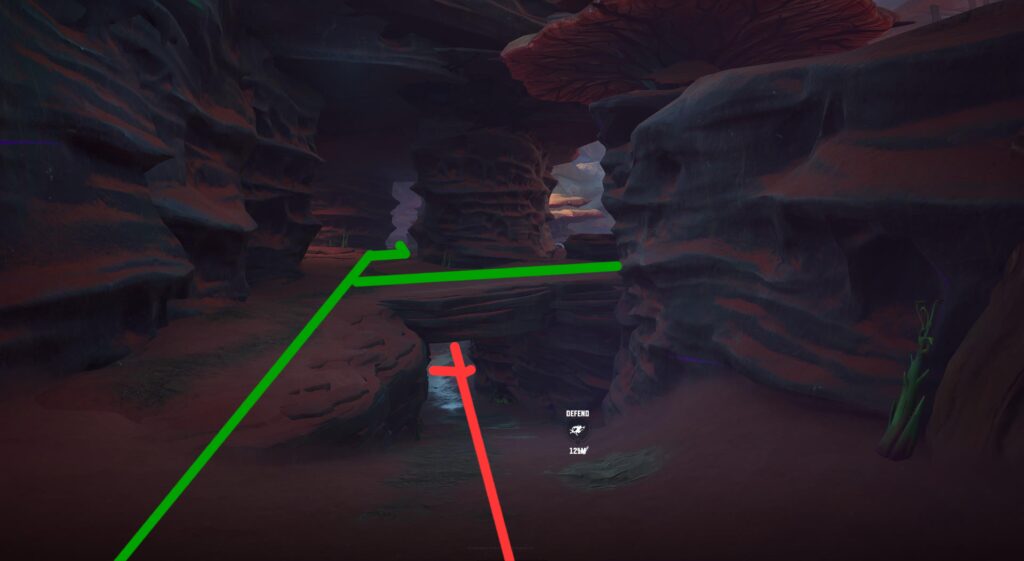
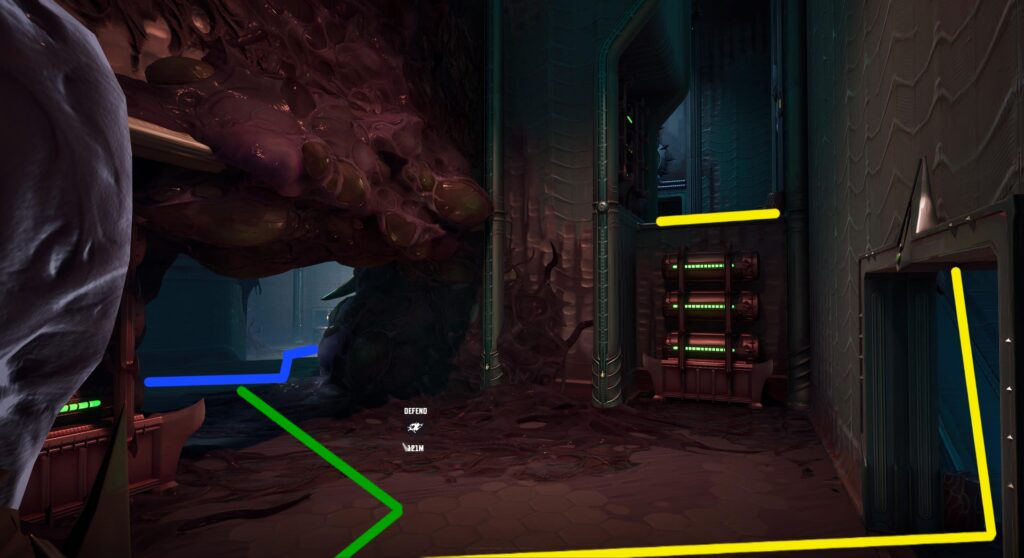
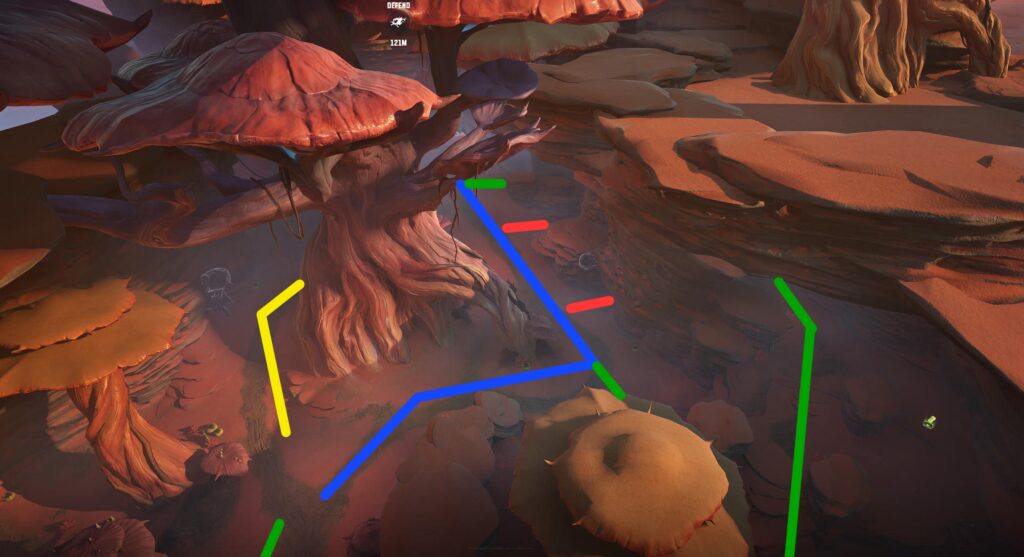
Along the cliffside is the green route, and an offshoot to the red route's cave below. Both routes have a connecting path to blue as well.
Here you can see where those routes reconnect again. The yellow route also bounces off here to a new route that hugs the rightmost flank to the objective. Defending divers may also use this route to flank attackers that have pushed near the end of the convoy's route.
This is a similar view, but rotated to show how these routes continue around that large tree in the center. Along the wall of the yellow route is another symbiote wall. Shooting it will block off this area unless you can scale the wall.

For a better look at that red route, this cave gives you a quick break from the action. You can discreetly mix-up your line of attack where opponents can't see you. If you move to that health kit, you can climb, fly, or jump upwards through a hole in the ceiling. This will take you back to the upper green route.
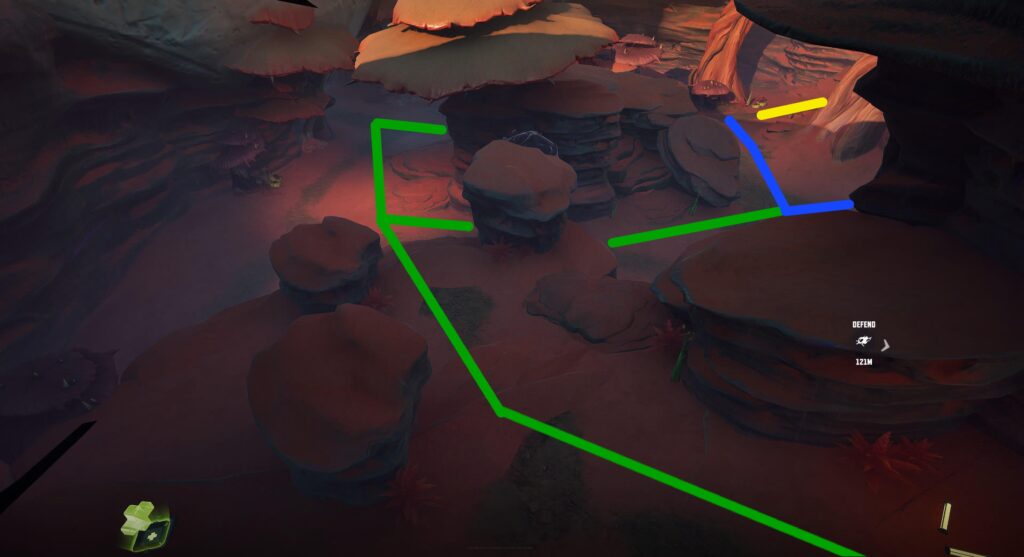
If you continue down the green route, you can wrap behind the objective, as well as towards the defenders spawn. In that gap on the green route is yet another symbiote that can be shot to make a wall, blocking off that escape route. This can often trap opponents in that pocket.
Here are the ends of each route. There isn't a lot of flexibility here, which is to be expected for the final push of the map. You can also cut through the bottom-center of the image, under those mushroom trees. It hides a small path that can give you high ground just above the objective.
This image is specifically for defenders. It appears most players aren't aware of the wide range of exit options you have from your spawn. It doesn't have to run directly to the blue route. Instead, you can hug the walls on both sides to wrap around the objective. If attackers push the objective near the end, attacking from these side angles can force them to be surrounded by your team, making it easier to push them back. Also, the spawn has a second door that never seems to get used. Attackers never pay attention to it either, so use it to your advantage! It also hold a health hit in the upper-right corner, as well as some soft cover to hide behind.